

HPLC Cloud Software Set-up
Manual
Manufactured by Newcrom Co. division of SIELC Technologies, Inc.
Introduction
HPLC.Cloud is the very first and only HPLC software that is accessible via the cloud. SIELC Technologies’ Alltesta™ is an innovative instrument with a cutting-edge approach to instrument control, data collection, data manipulation, and data storage.
Each unit of the Alltesta™ is directly connected to a secure cloud server via a local Ethernet line or wireless network.
No installation or support is needed to gain access to the software as HPLC Cloud is a web-based application where only a username and password are needed. Simply sign up online to get started.
SIELC’s StreamLC module provides the connection to the cloud. It is a chromatography data acquisition device that connects all the units on your account to the software. This device allows you to access and control your laboratory from anywhere in the world, at any time, on any device with only an internet connection needed.
Devices
(This set-up can be done via any device that has connection to the internet: phone, tablet, laptop, etc.)
- In order to set up and connect your devices to the cloud, start by creating an account on the website HPLC.Cloud. Click “Sign Up” as shown below:
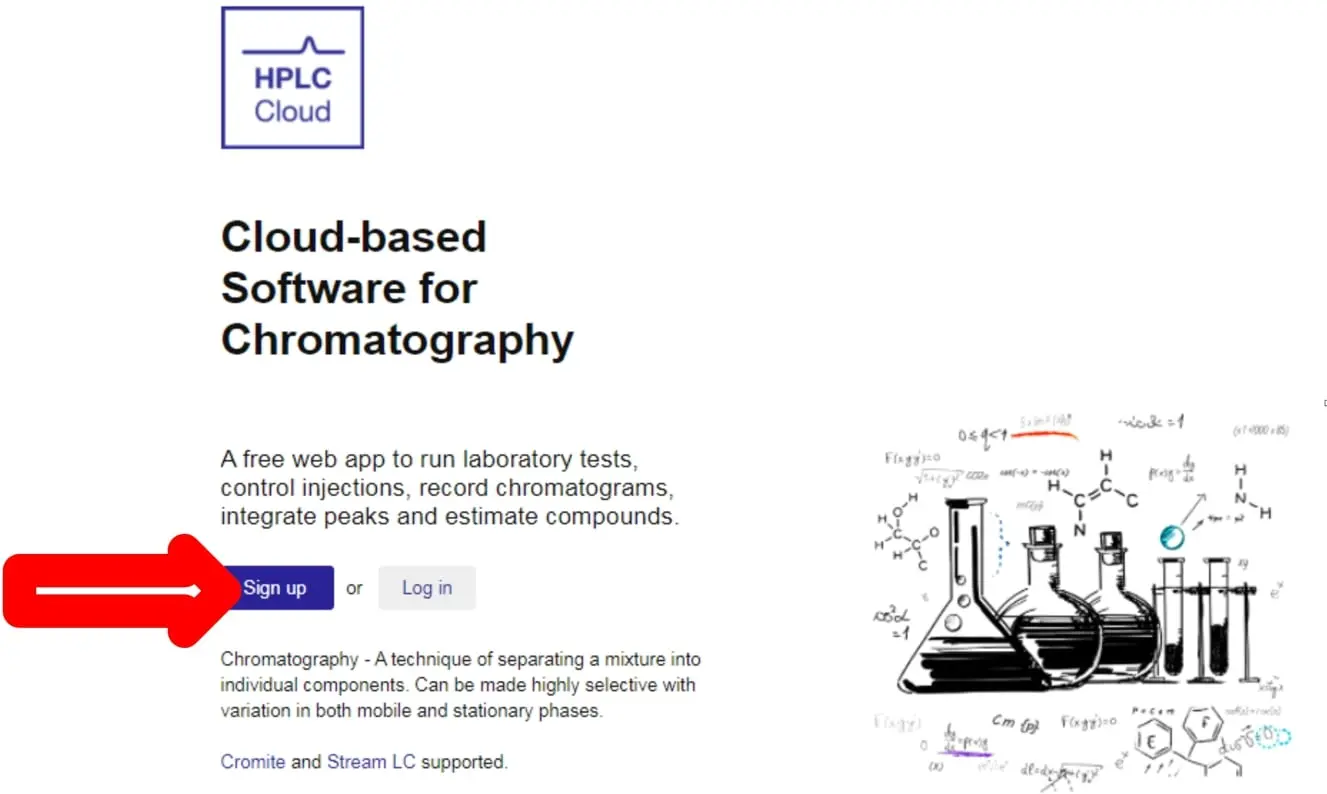
- By clicking the Sign Up button you will be directed to the Sign-Up page:

- Enter in the required information, click Sign Up and your account set-up is complete.
- You will receive an email shortly after confirming that your email has been registered with the software.
- After that is complete, login to your account and you will be taken to a screen that should show this:
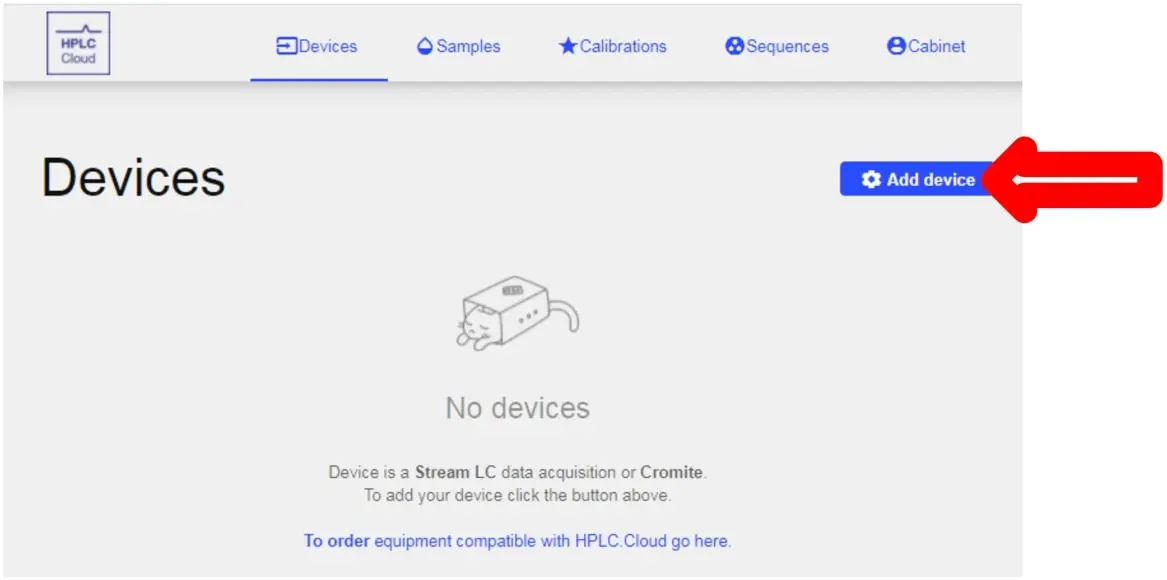
- To add your device(s) to the software you will need to click the Add Device button shown above.
- You are now going to be shown the screen below, which will ask for the serial number and key of your device. These can be found on the back of each power tower or on the bottom of your standalone StreamLC.
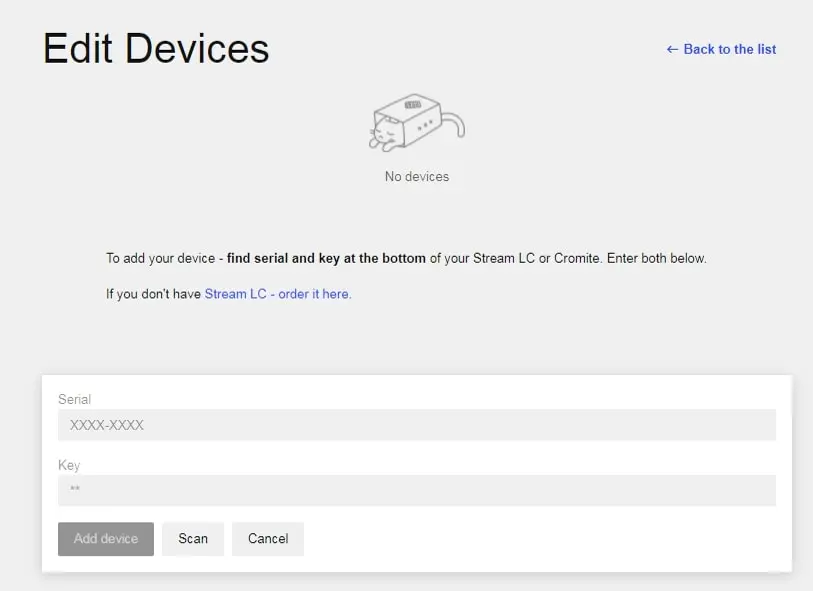
Note: All units have been tested by SIELC. A message might pop up saying that “these units belong to sales@sielc.com.” Just confirm that you want to delete them from that account and transfer them to your own account.
- Repeat steps 6-7 to add each Power Tower/StreamLC that you have to your HPLC.Cloud account.
- Once you have added each device to your account you will be able to see them all by clicking the Devices tab at the top of the screen.

- Now you can select the system that you want to use by clicking on the StreamLC/Tower (you can rename each device by clicking on the serial number once you have the specific one opened):
- If your device is not plugged in, it will appear • Offline.
- If it is plugged in, it should appear • Online.

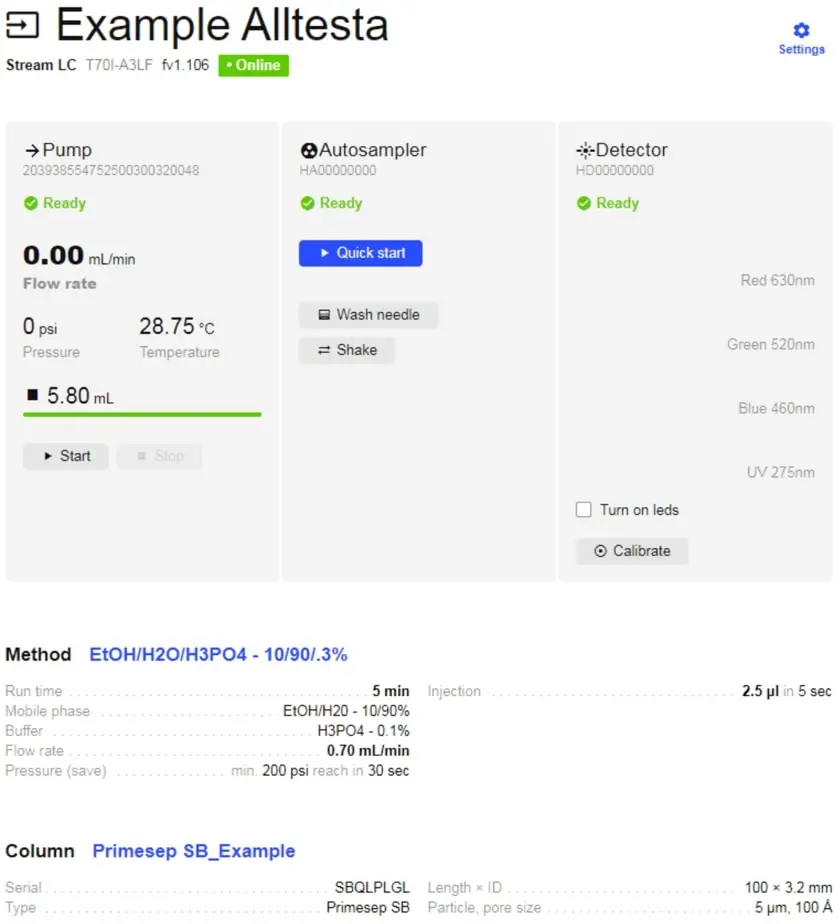
- When you click on your device, it may look like the image below.
- First, check that your firmware is up to date by clicking on the blue text starting with fv. If there is a new firmware version, click Update Now.


- Once it is updated, click OK.
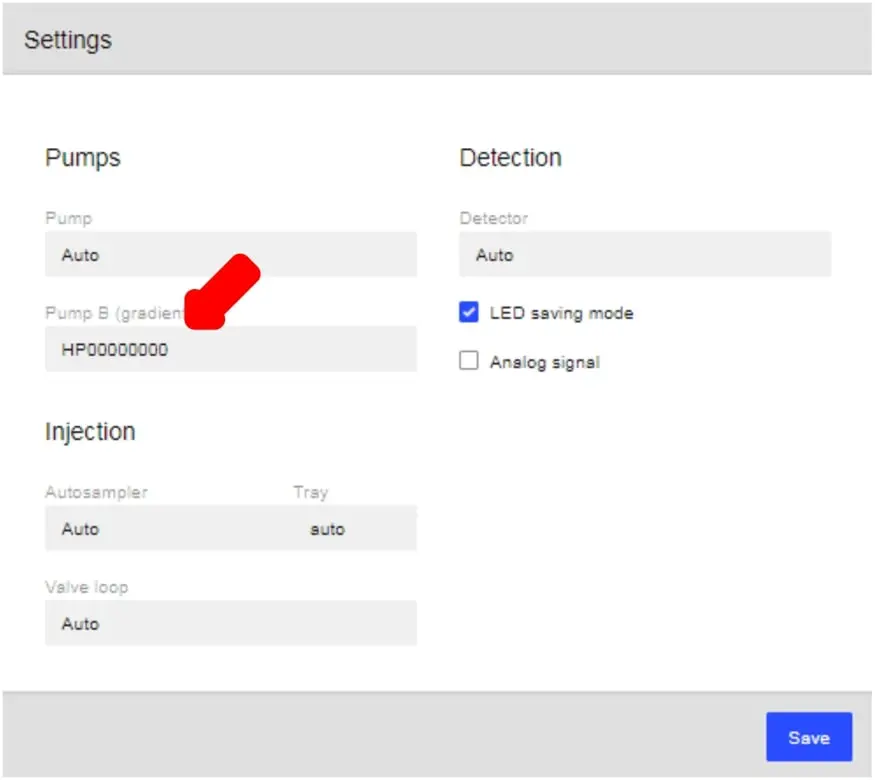
- To connect equipment (Autosampler, Pump, Detector, etc.), click on “Settings”.
- Auto: This will automatically select the device.
- H(P/D/A)000000000: The letter in the 2nd position depends on the device (Pump, Detector, Autosampler).

- Select the devices from the appropriate drop-down menus. The options are:
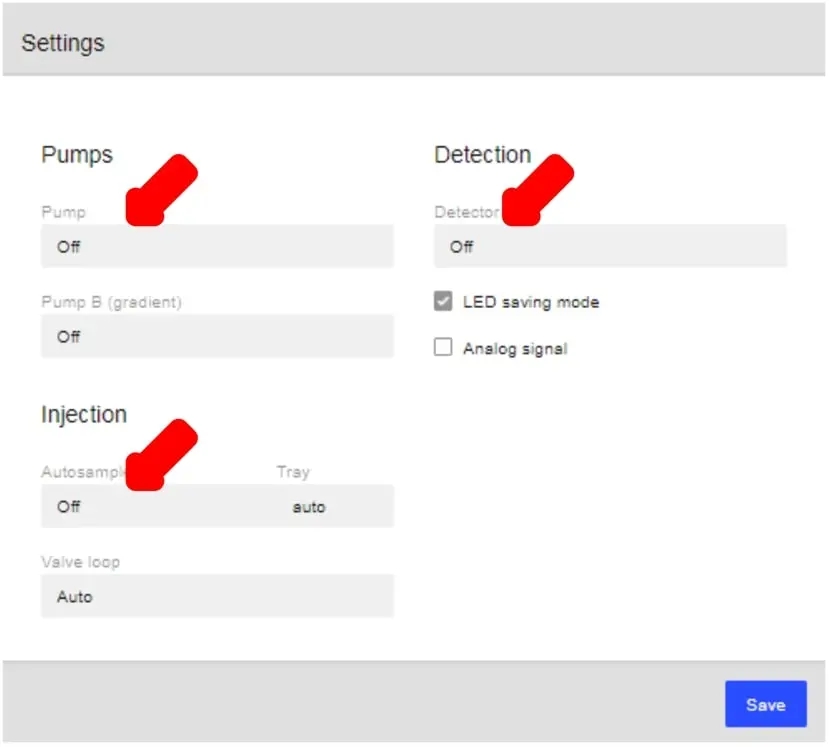
- If you are using a gradient system (2 pumps), select the 2nd pump. Using the gradient system will be discussed in the Injections section.
- Once you add all the component devices, you will be able to see and control each one (pump, detector, valve, etc.) that is associated with that respective device.
- Note: if your Alltesta™ Mini/standalone devices are not connected to the Power Tower/StreamLC, no devices will be shown.
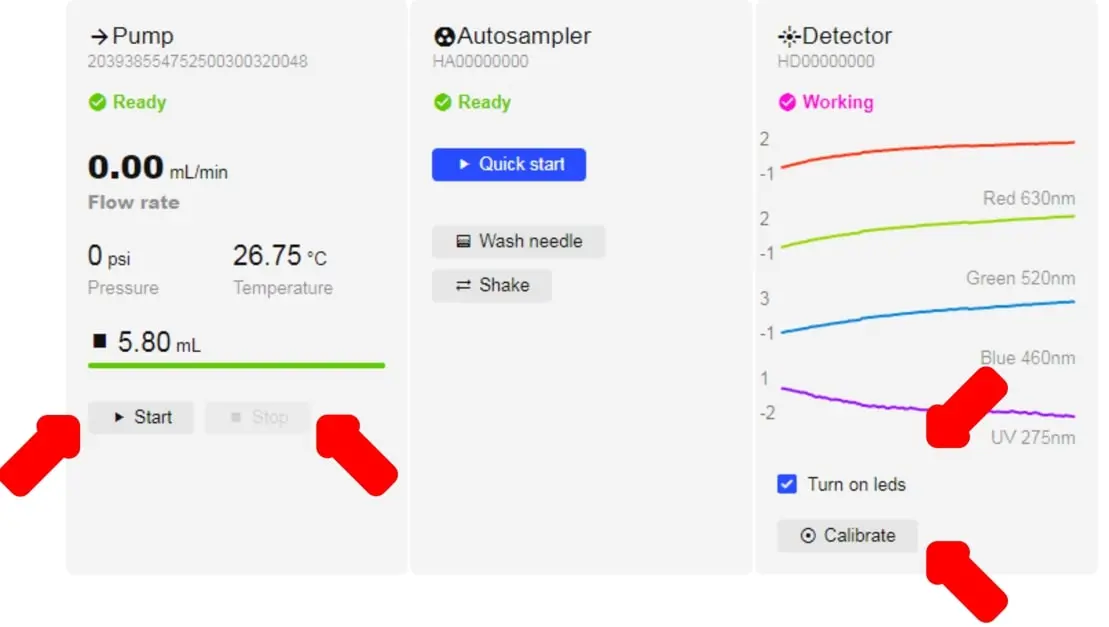
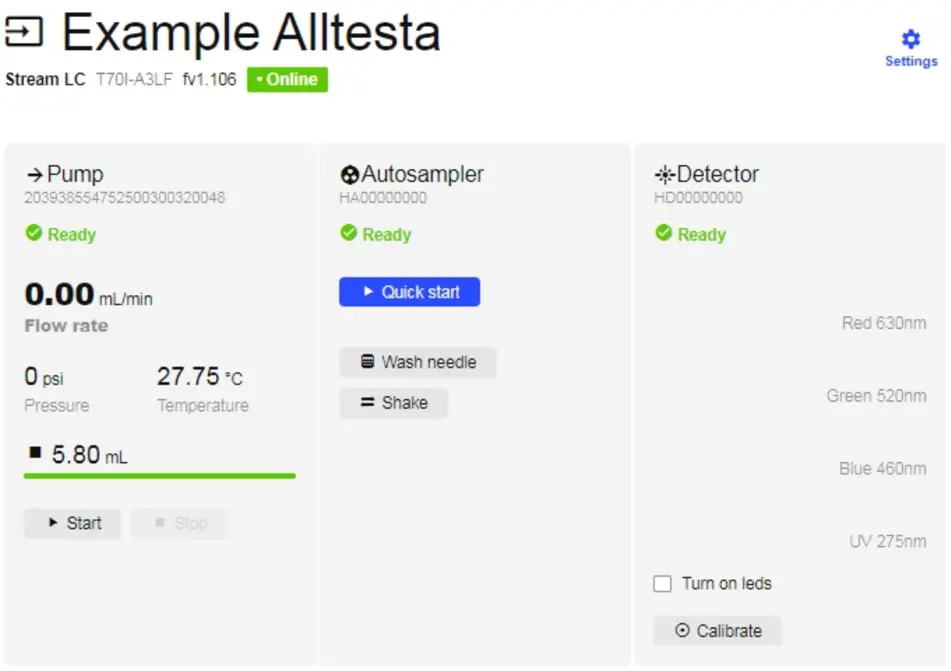
- In order to control the Detector manually (without a test/sample) there are 2 buttons as shown above: Turn on LEDs and Calibrate.
- “Turn on LEDs” refers to the 4 different colored diodes that the detector has. Each diode emits light with the maximum wavelength indicated. The image above shows a real-time plot of a signal of all four available wavelengths.
- The “Calibrate” button allows you to “zero” all four signals at the same time and can be performed manually or be done automatically before each injection.
- There is also a manual pump operation that can be performed without making an injection. The manual Startand Stop buttons are used to quickly replace the mobile phase in the pump, or to remove air from the pump barrel. Manually operating the pump is the recommended way to change mobile phases as it will clean out the pump/capillaries.
Samples
- In order to set-up a sample to begin your testing, you’ll need to click on the Calibrations tab at the top of the screen.

- Click on the New button to create your first sample:

- This screen below will now be prompted in front of you where you will be asked to detail your sample. Fill in everything related to your sample and click Create.
- Select the device and method you will be using for this sample.
- We will explain in the “Injections” section how to create a “Method.”
- In this example, we’ll be testing for caffeine in a sample of instant coffee. We’ll use the device “Example Alltesta” and a method using a mobile phase of 10% ethanol, 90% water, and a buffer solution of H3PO4 at .3%.

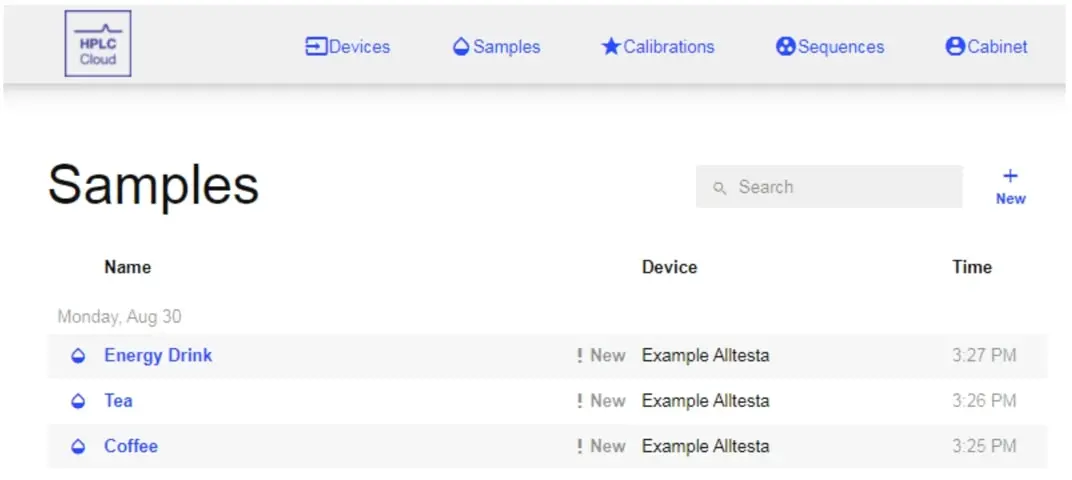
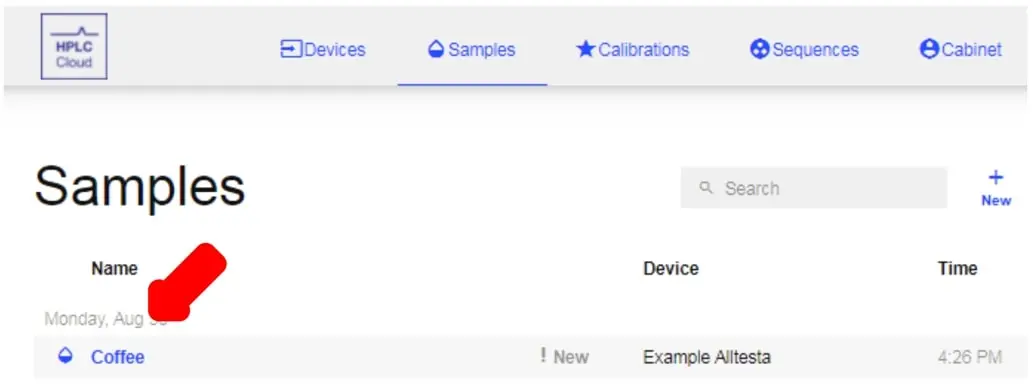
- Once you have filled out everything related to your sample, it will now be shown under the “Sample” tab of the application.

- Repeat steps 1-4 to add as many samples as you’d like. Samples can be added at any time and need not be done all at once.
Calibrations
- Calibrations are used to calculate the concentration of a compound in an unknown sample.
- In order to set-up a Calibration click on the Calibrations tab at the top of the screen.

- Click New to create a new Calibration.

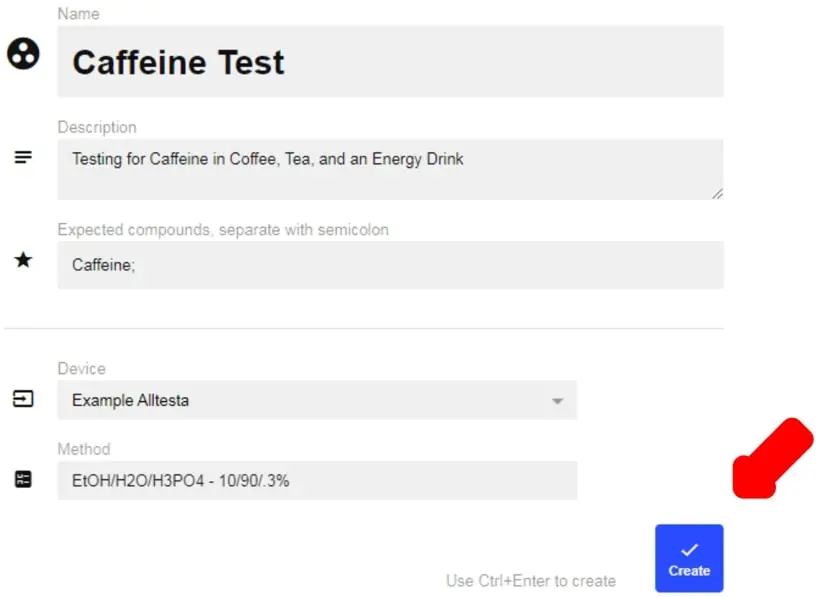
- Input the compound name you are setting the Calibration for and select the Device, Method, and Column, then click Create. In this example, we’ll be using a Caffeine standard with a concentration of 1 mg/mL.

- Once the Calibration is created, it will appear under the Calibrations tab.
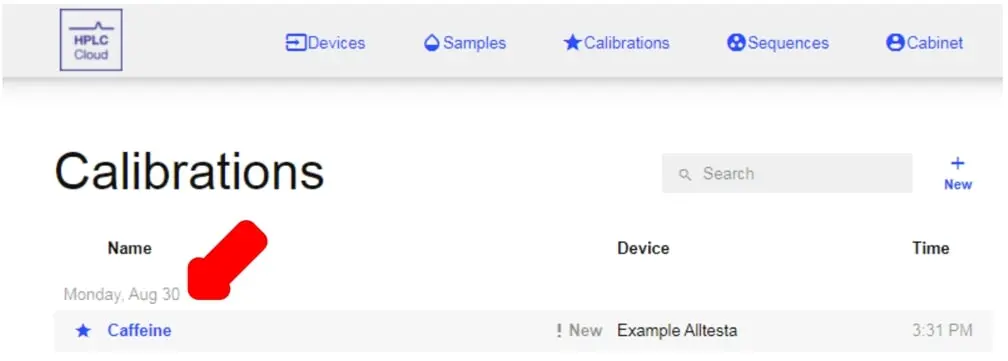
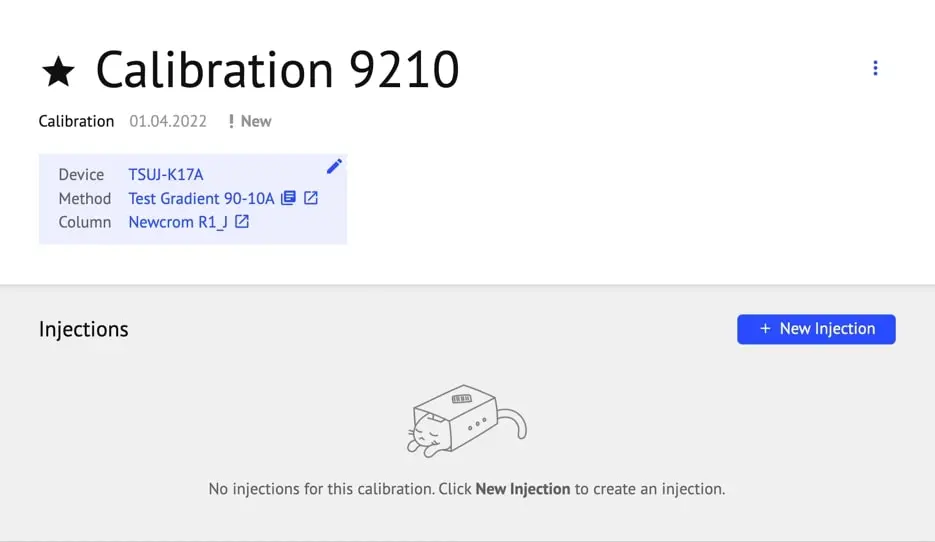
- Click on the Calibration’s name (ex. Caffeine to open its page, seen below).
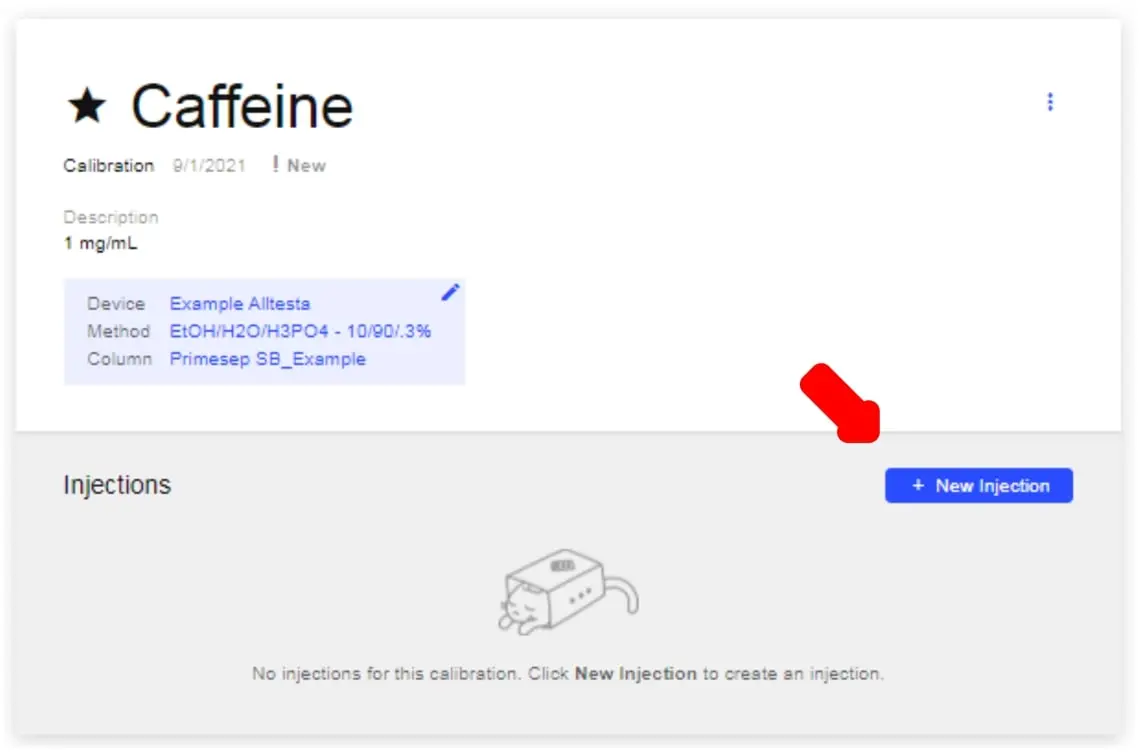
- To start a new Calibration Injection, click New Injection.
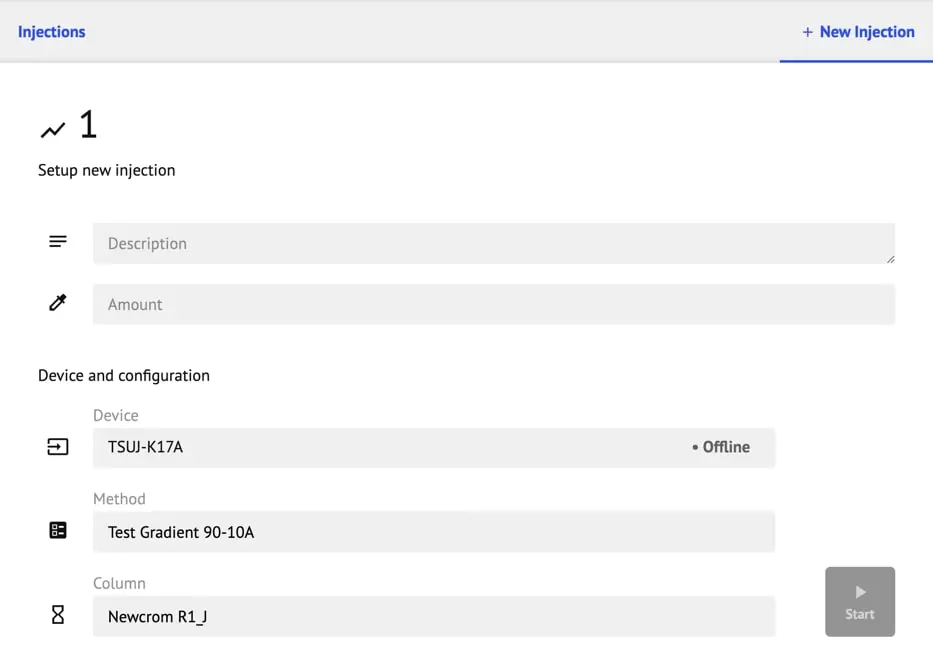
- Input the Vial location and Concentration (in mg/mL) information, then click Start.
- Note: The Device, Method, and Column information should automatically populate since we already input this info when creating the Calibration.The Device, Method, and Column information should automatically populate since we already input this info when creating the Calibration.
- After the scan is complete, select the peak of the analyte that you want to use for the calibration. To do this, hover over the row of the desired peak and click Select.
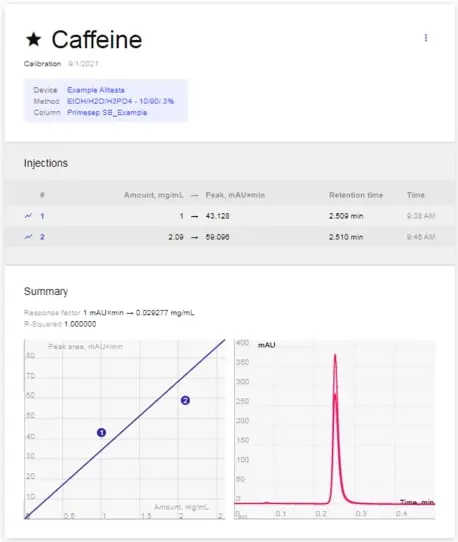
- To see the Calibration, click “Injections” on the top left of the graph.

- You should see 2 graphs: One graph (left) showing the linear regression used to calculate the calibration (peak area vs. amount) and the other graph (right) overlaying peaks of the various standards used for that Calibration (see below where multiple standards were used).
- We will explain later in the “Sequences” and “Injections” sections how to utilize the Calibration to calculate the unknown concentration of the compound of interest in a Sample.
Sequences
- Sequences allow users to automate and group sample testing. While optimized for use with an Autosampler, it can be utilized with manual injections.
- To create a sequence, click the Sequences tab at the top of the screen.

- Click New.

- Input all relevant information and then click Create.
- Created sequences will then appear under the Sequences tab as shown below.

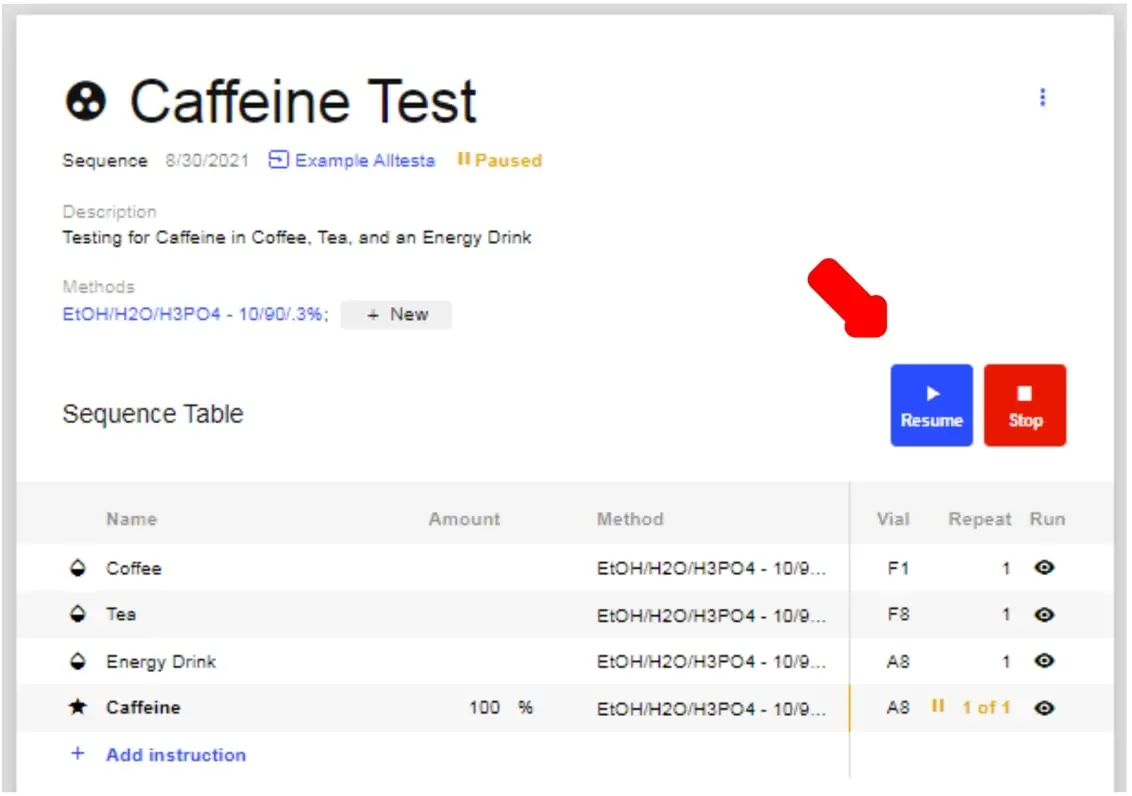
- Click on the newly created Sequence (in this example, Caffeine Test). This will open up the Sequence window.
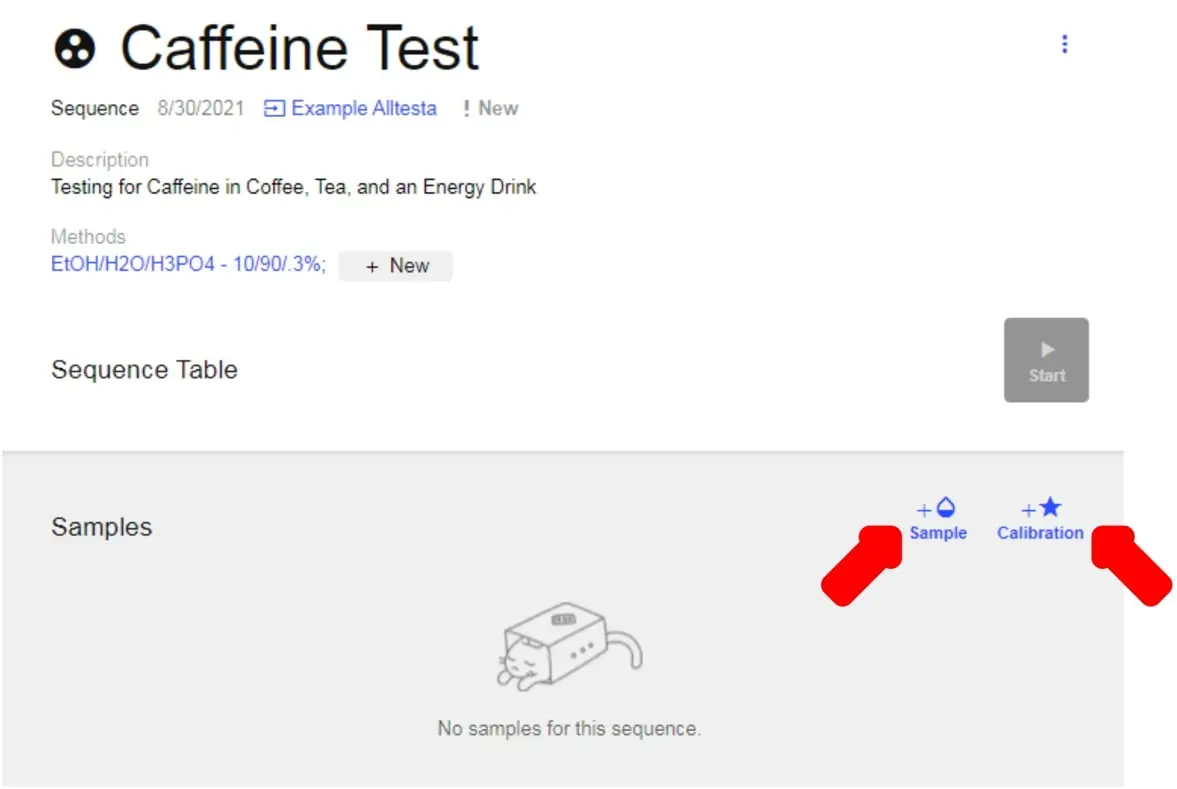
- To add Samples and Calibrations to your Sequence, Click the “+ Sample” and “+ Calibration” buttons as shown above. This will create a generic list of Samples and Calibrations.

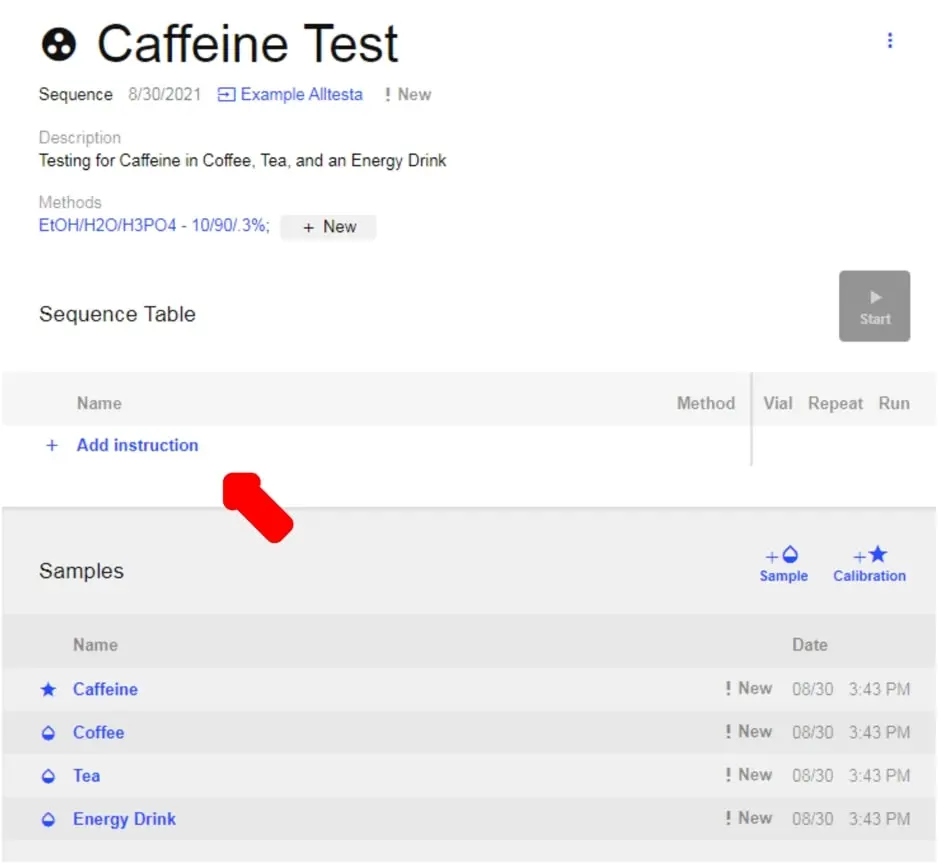
- To edit the Samples/Calibrations, click on each one and then click on the title to edit (similar to how Device names were edited).
- Now click “Add Instruction” for each Injection you want to do.
- To select a Sample/Calibration for an Instruction, click on the Name of the Sample for the respective instruction and a drop-down list will appear of all available Samples and Calibrations.
- Choose the Sample/Calibration you want to set for that instruction.
- For the Calibration(s), first select your preferred units by clicking the “%”. A drop-down menu will appear and you will be able to select from the following options:
- %
- mg/mL
- Mol
- mMol
- Click on the “0” and type in the concentration you are using for that standard.
- The Method you input when creating the Sequence should automatically be selected for each Instruction.
- If you want to add additional methods, click + New.
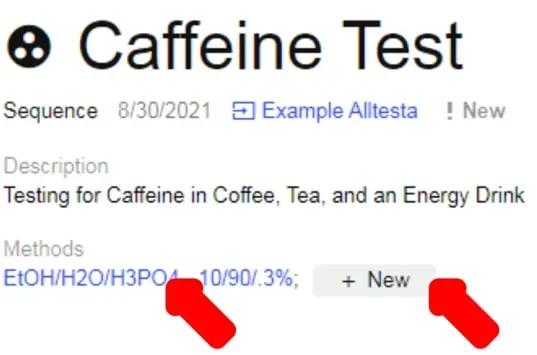
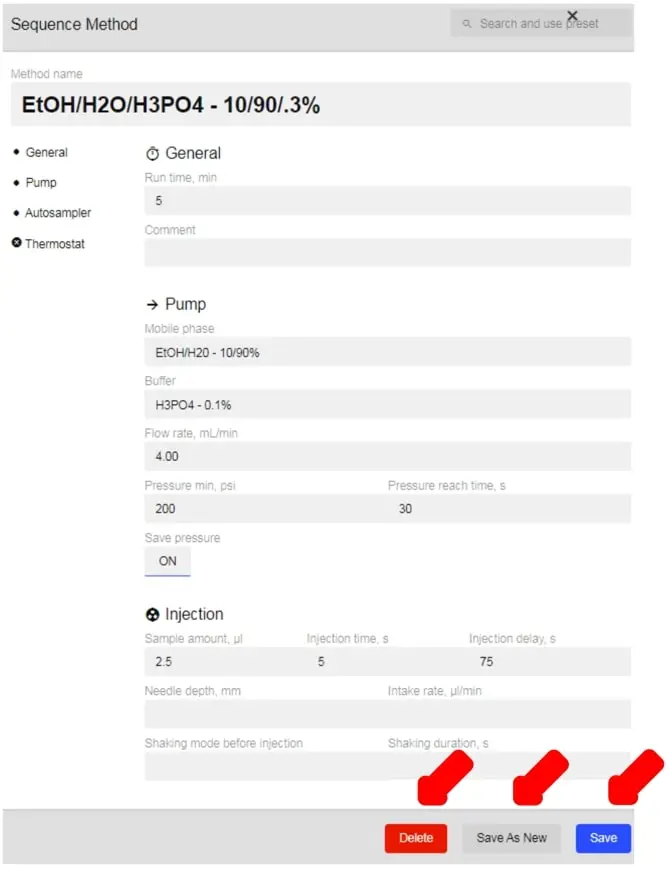
- If you want to alter any current methods, click the Method’s name under Methods.
- This will open the window to edit the selected Method.
- To save your changes, click Save.
- To save your changes as a new method, click Save as New.
- To delete the method, click Delete.
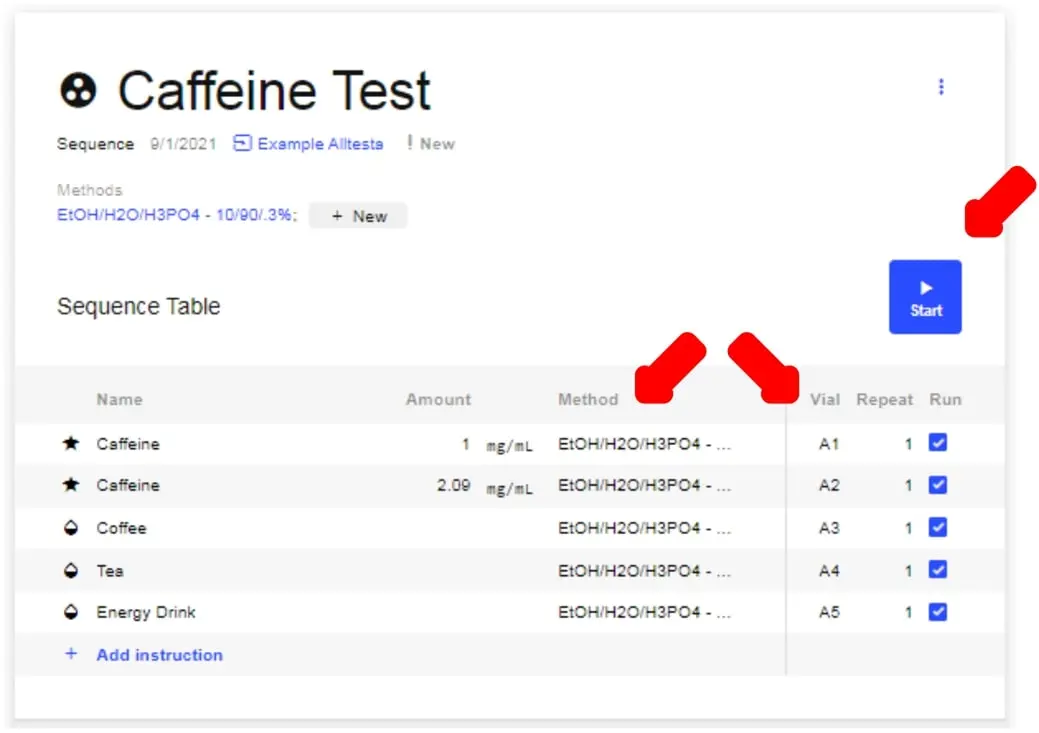
- Select the Method for each Sample as you prefer.
- For each sample, select the vial location for the Autosampler to test each sample.
- Click Start to run the Sequence.
- To view Sample Injections, click on the name of the desired Sample.
- To Stop or Pause a Sequence, click “Pause” or “Stop.” This will only stop/pause future tests.
- Note: This will not stop/pause the current injection.This will not stop/pause the current injection.
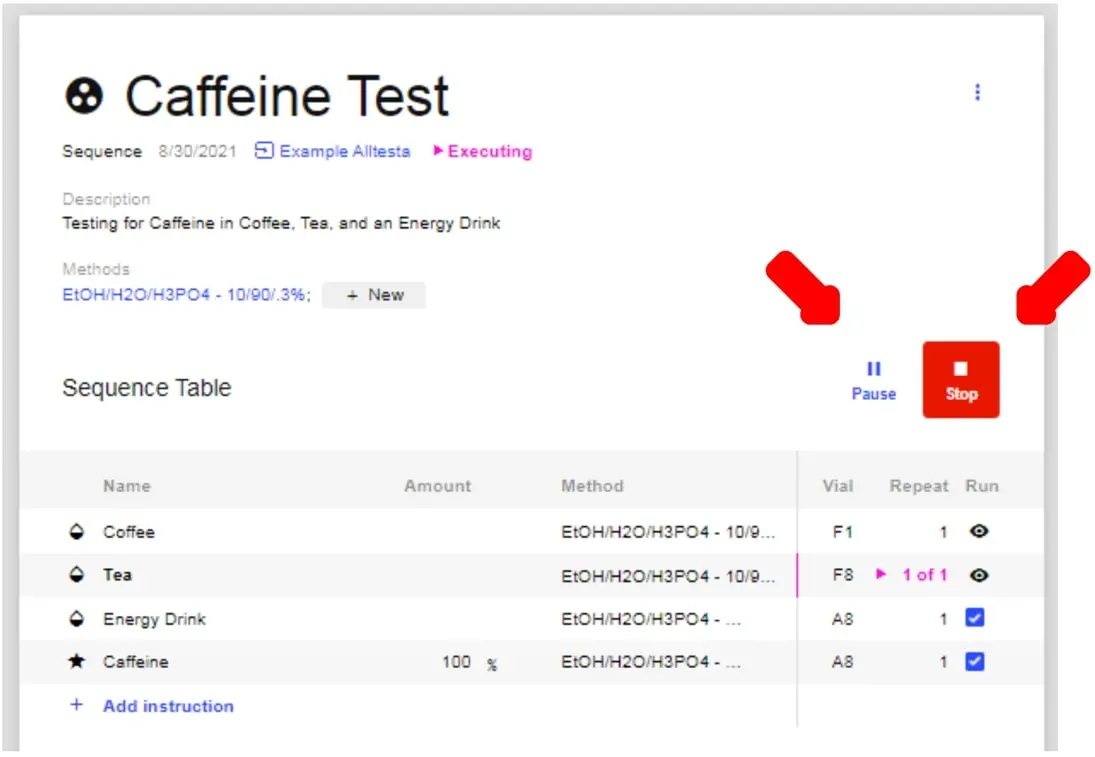
- To stop the current injection, open the currently running Sample and click “Stop.” If the Sequence was not already Stopped, then this will Pause the Sequence.
- To resume the Sequence, click “Resume.”
Injections
Autosampler Injection
- For users with an Autosampler, continue below. For users manually injecting their samples, skip to “Manual Injections.”
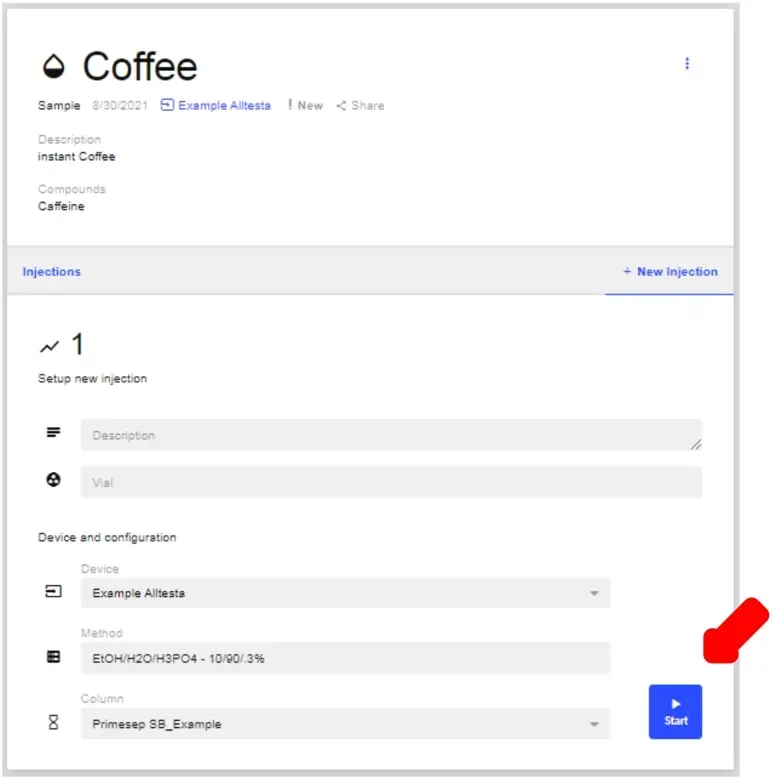
- When you’re ready to begin an injection using the Autosampler, first click on the desired sample you would like to use (ex. Coffee):
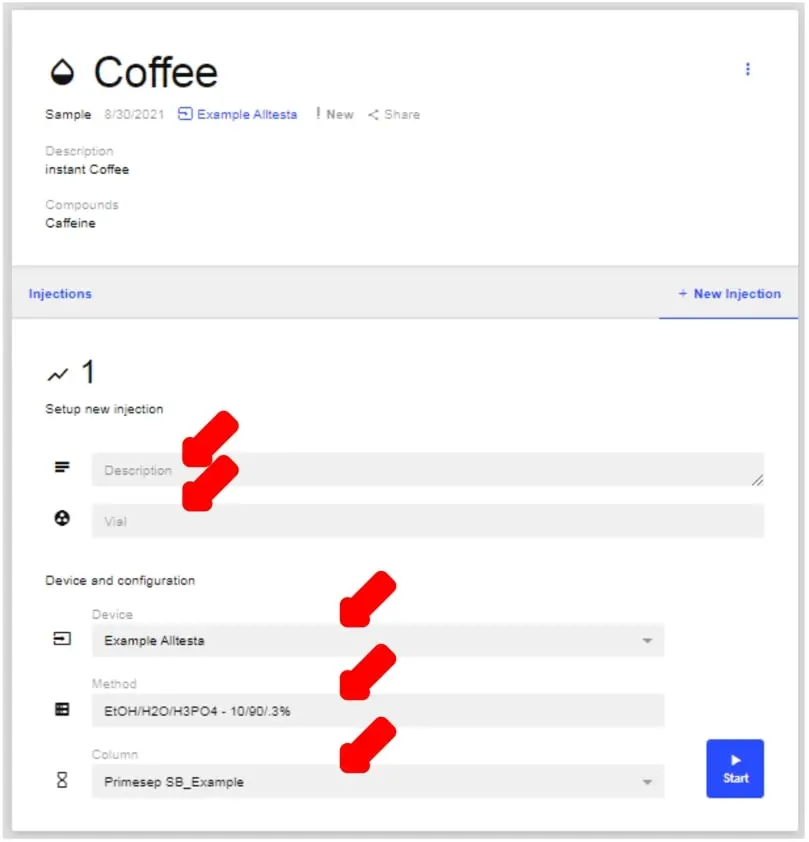
- Once the sample is opened, click on New Injection to begin:

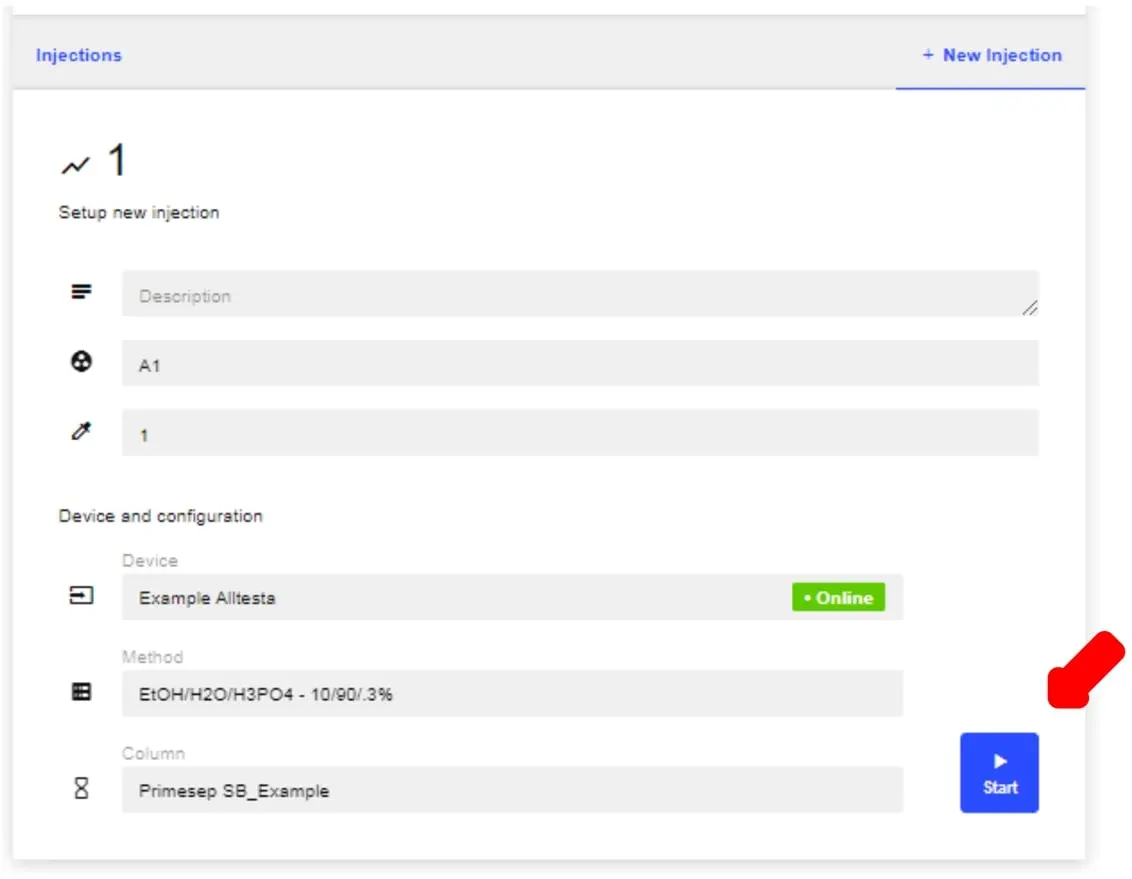
- You will now be prompted with this screen that will ask you for all information related to the injection. **You will need to choose a method, column, and vial.** Once you have filled in all the info, click Start.
- Note: make sure you have the correct device selected on the first line before proceeding. You will not be able to begin without doing so.
- Note: You have the option to add in a brief description of the sample as well.
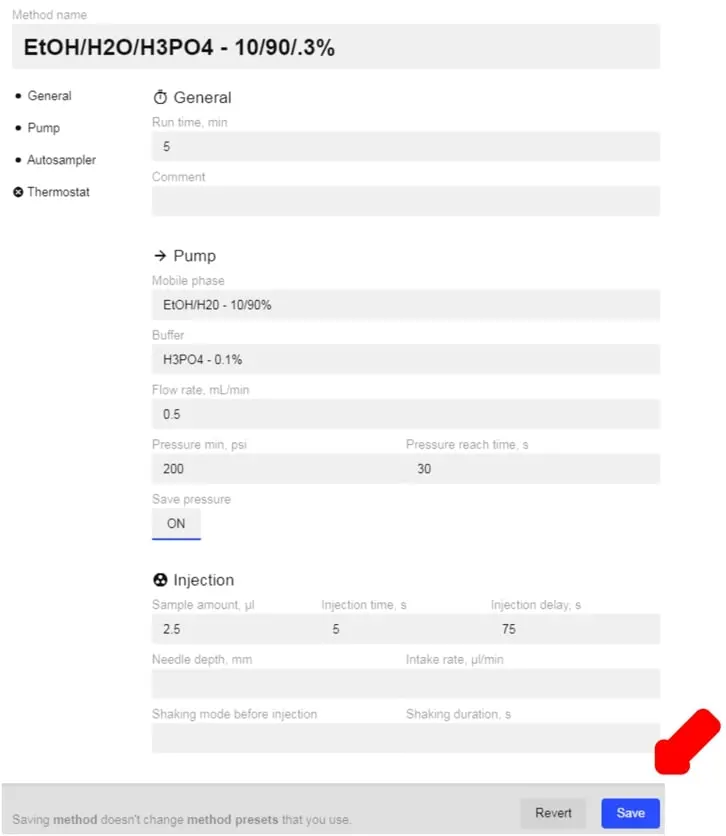
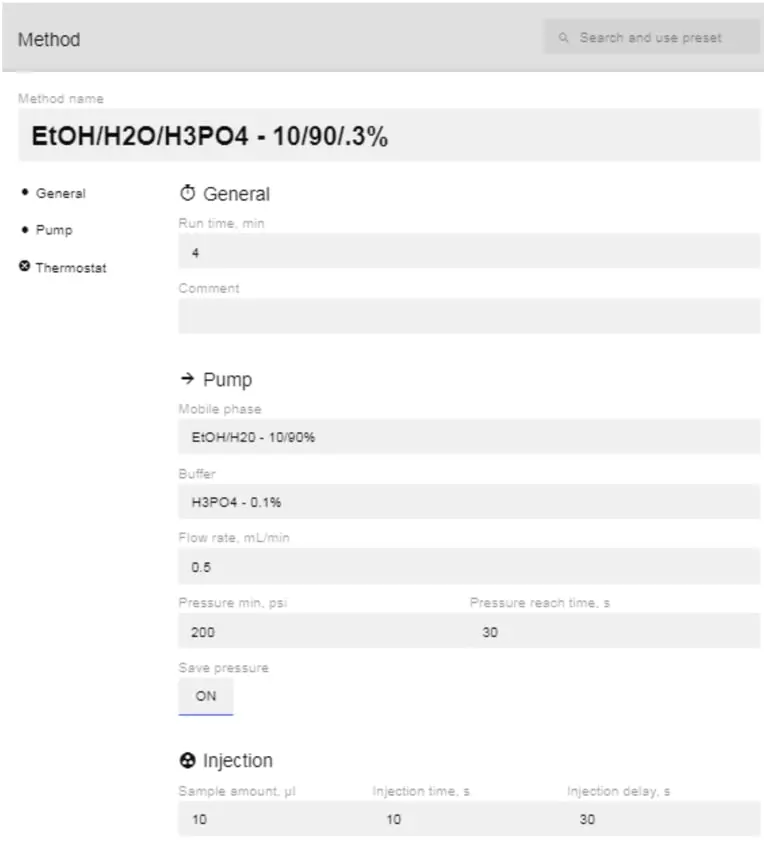
- Before you begin the injection, you will need to create the Method. Click on the Method name (above). Below is all the information that needs to be filled out:

- Each system also has 3 methods that have been downloaded onto it. You can see them by clicking on the search bar (above) at the top of the screen and selecting which method you would like.
- When you select a method preset, it will fill in everything automatically for you, except the buffer, pressure min, psi, and pressure reach time, sec. Fill these out and click Save to finish and use this method for your injection. Alternatively, you can fill in the information manually to customize the method. Below is an example of a custom method.
- The Flow Rate correlates to the internal pressure (higher flow rate = higher pressure, etc.).
- Enabling Save Pressure will allow you to track the pump pressure throughout the test.
- A longer Injection Time can ensure all of the collected Sample Amount is injected.
- Injection Delay can be useful for ensuring the detector reaches a proper baseline before the sample is introduced.
- Intake Rate sets how fast the Autosampler will collect the sample. The default setting is 10,000 µL/min. Generally speaking, slower speeds will produce more accurate results. See the Index section “Autosampler” for recommended rates based on sample size.
- For most applications, you can leave Needle Depth, Intake Rate, Shaking Mode before Injection, and Shaking Duration blank.
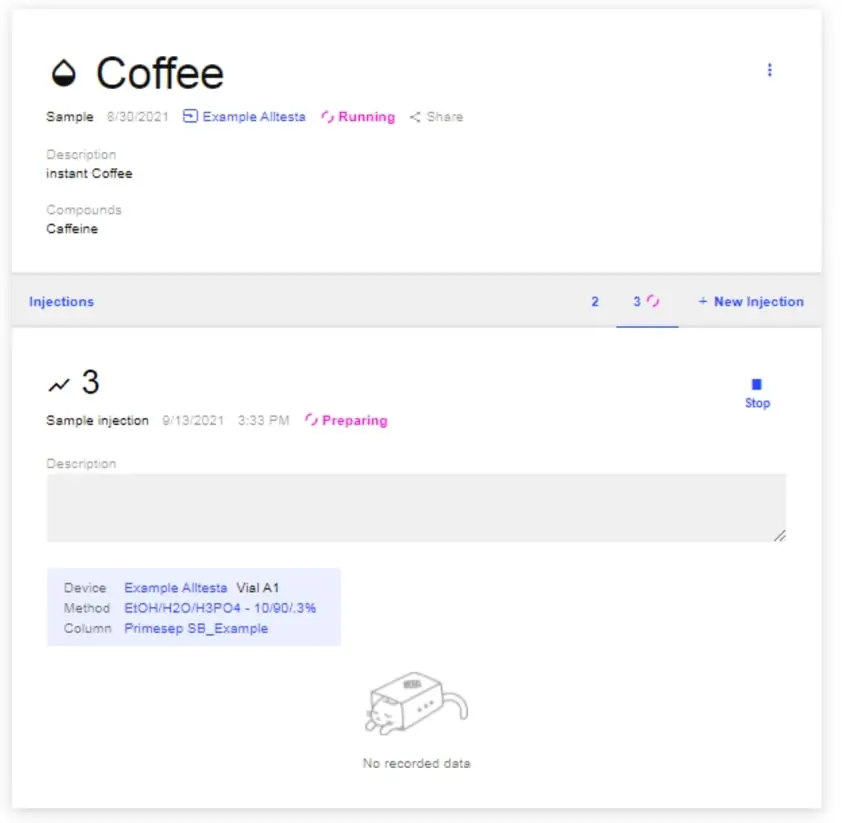
- Click Start and the chromatogram will automatically present itself on the screen.
- Note: when injecting your sample, volumes between 1-10 μL (0.001-0.01 mL) should be enough for a quality result. Larger volumes injected may cause the sample to be too concentrated, which, in turn, may result in a very large area under the peak of interest. when injecting your sample, volumes between 1-10 μL (0.001-0.01 mL) should be enough for a quality result. Larger volumes injected may cause the sample to be too concentrated, which, in turn, may result in a very large area under the peak of interest.
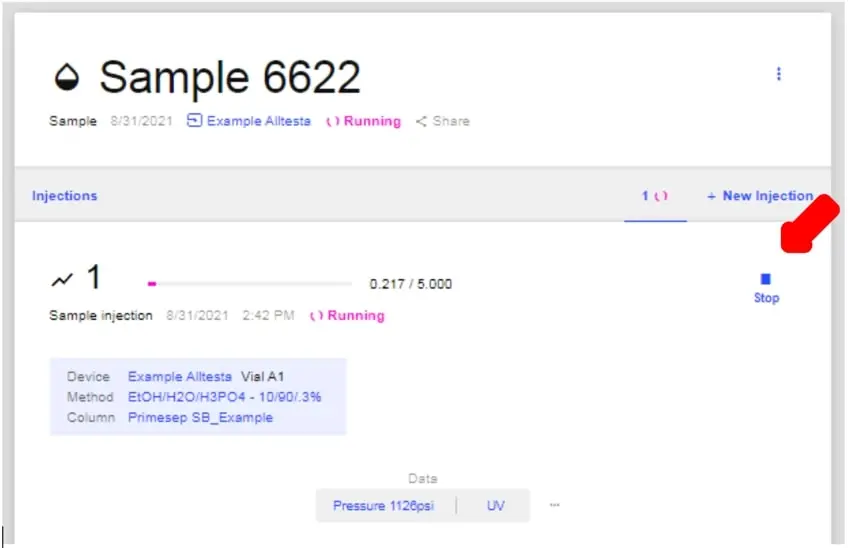
- The image below shows the window that will appear when the scan starts.
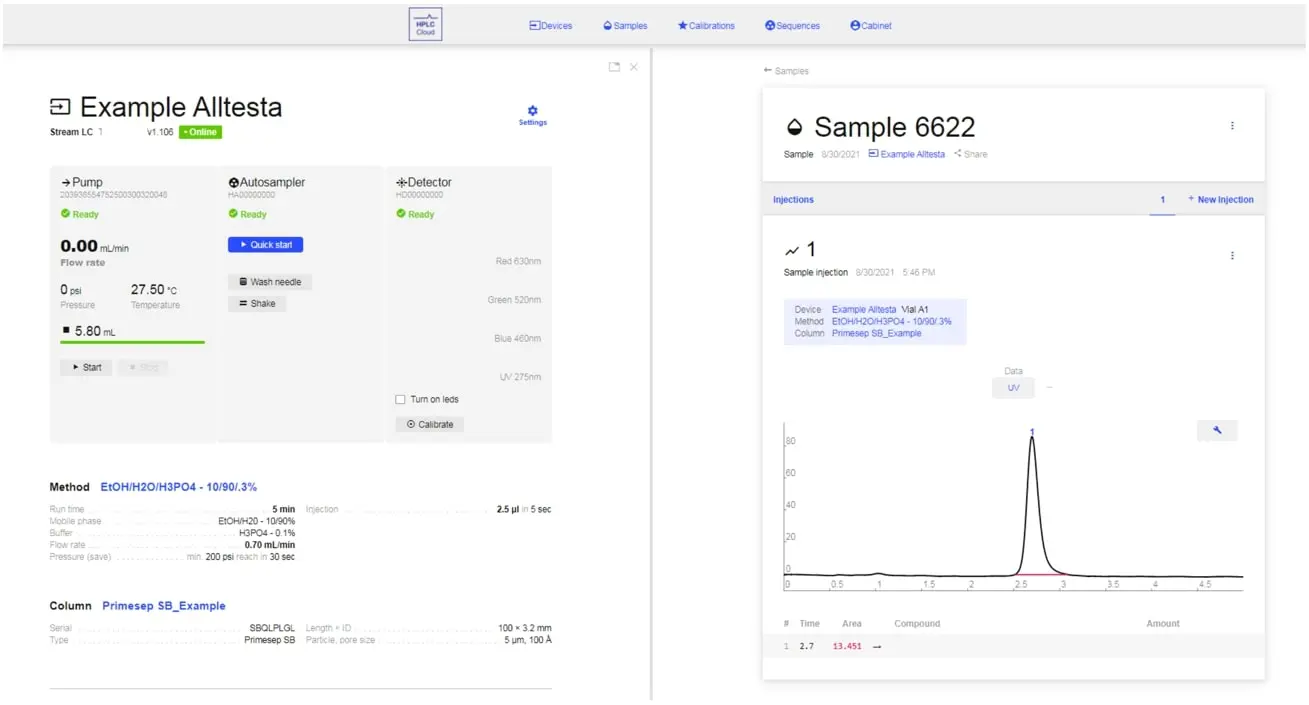
- The image below shows a completed scan of a Coffee sample using an Autosampler.

- Now we will calculate the amount of the compound in the sample using the Calibration created earlier (in this case the amount of Caffeine in the Coffee sample).
- Move your mouse over the peak’s row and click the Blue Star that appears.
- A popup will appear allowing you to select a Calibration from a drop-down menu.

- Click “Estimate” after you have selected the Calibration you want to use.
- The graph will now show the calculated amount of the compound in question for this particular injection based on the Calibration.

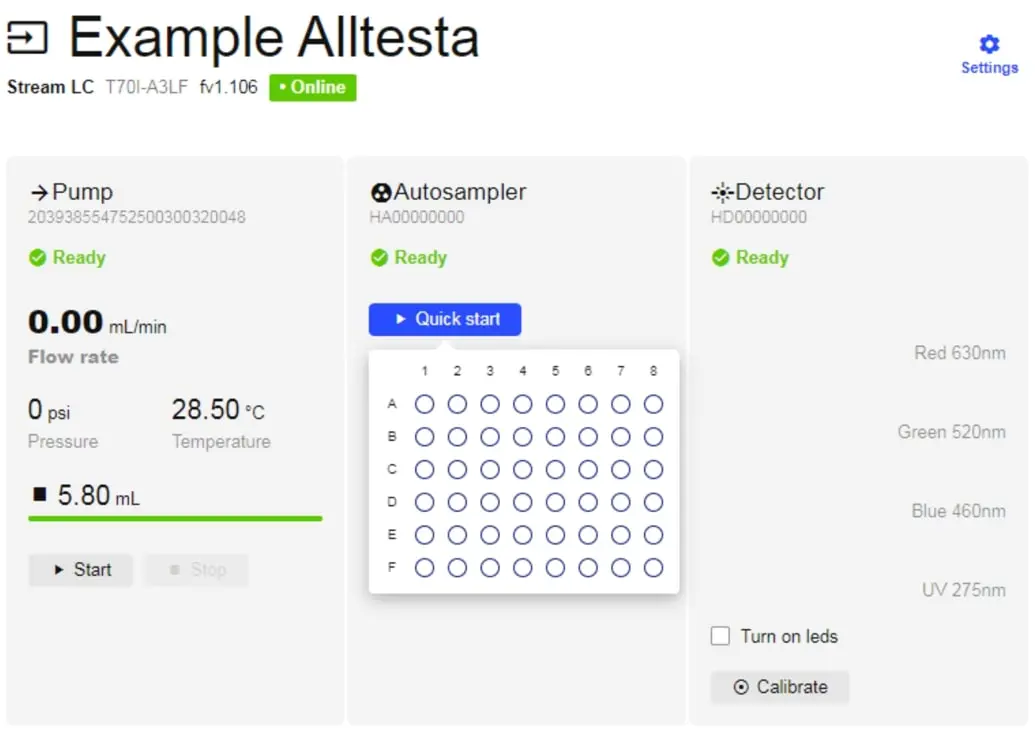
- You can also run an injection using the “Quick Start” method.
- First, ensure the Method and Column selected for your device are correct.
- Then click Quick Start and select the Vial you want to test. The system will start the Injection.
- To see the chromatograph, click on the Sample title that appears at the top of the page.
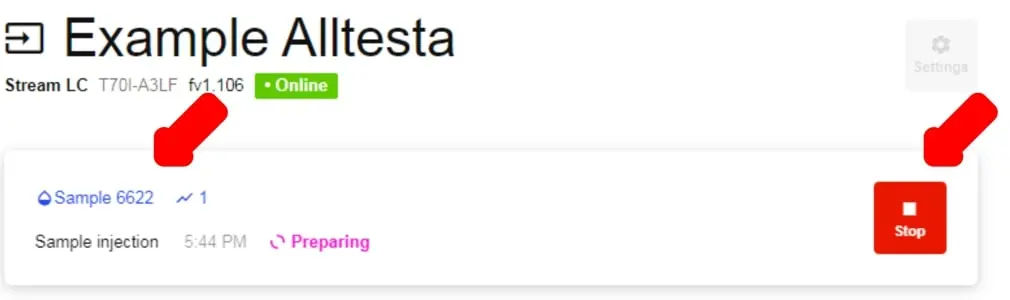
- As shown above, one can stop the Injection by clicking the Stop button.
- If you are viewing the chromatograph, you can also stop the Injection by clicking Stop.
Manual Injection
- For users manually injecting their samples, continue below.
- When you’re ready to begin a manual injection, first click on the desired sample you would like to use (ex. Coffee):
- Once the sample is opened, click on New Injection to begin:
- You will now be prompted with this screen that will ask you for all information related to the injection. **You will need to choose a method, column, and vial.** Once you have filled in all the info, click Start.
- Note: Make sure you have the correct device selected on the first line before proceeding. You will not be able to begin your injection without doing so
- Note: You have the option to add in a brief description of the sample as well.
- Before you begin the injection, you will need to create the Method. Click on the Method name (above). Below is all the information that needs to be filled out:
- Each system also has 3 methods that have been downloaded onto it. You can see them by clicking on the search bar (above) at the top of the screen and selecting which method you would like.
- Note: when manually injecting your sample, do not rely on the measurement from the syringe - it is imprecise. Manual injections will be “full loop” injections, meaning the injection volume will be based on the (fixed) volume of the capillary tube connecting positions 1 & 4. You can either calculate the volume of a custom-cut capillary (length x internal diameter) or purchase and use pre-cut capillaries with known volumes.
- When you select a method preset, it will fill in everything automatically for you, except the buffer, pressure min, psi, and pressure reach time, sec. Fill these out and click Save to finish and use this method for your injection. Alternatively, you can fill in the information manually to customize the method. Below is an example of a custom method.
- Enabling “Save Pressure” will allow you to track the pump pressure throughout the test.
- A longer “Injection Time” will give more time for the mobile phase to pass through the loop.
- “Injection Delay” can be useful for ensuring the detector reaches a proper baseline before the sample reaches the detector. “Injection Delay” can be useful for ensuring the detector reaches a proper baseline before the sample reaches the detector.
- For most applications, you can leave “Needle Depth,” “Intake Rate,” “Shaking Mode before Injection,” and “Shaking Duration” blank.
- As mentioned in the Alltesta™ Mini Analyzer Set Up Guide, your valve set-up should look like this:
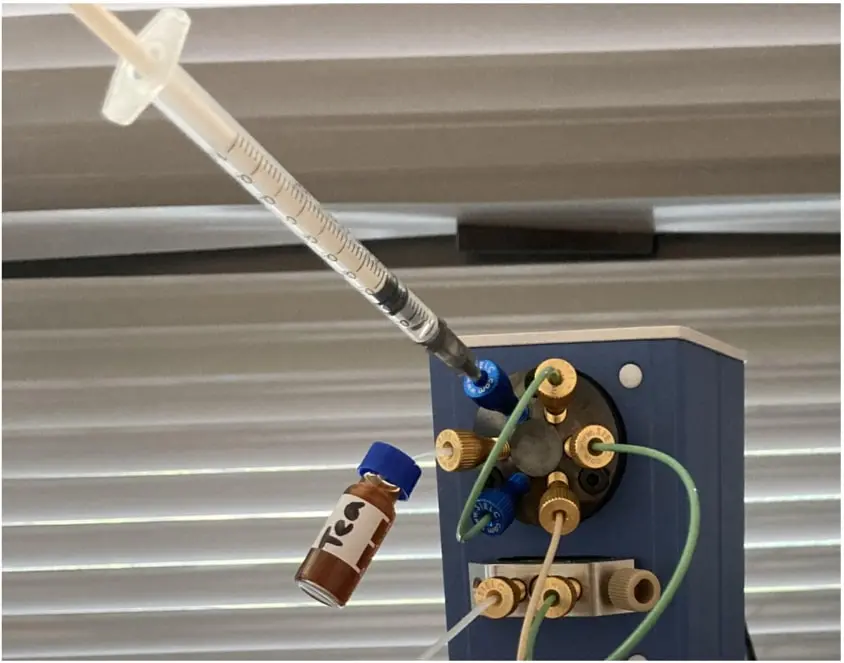
- This set-up will allow you to easily swap out sample and wash vials between tests.
- The only ‘moving’ part will be the sample vial; the syringe will remain fastened in place.
- Before you start the Injection, raise the plunger of the syringe slightly so that you pull your sample through the green capillary loop (connecting positions 1 & 4). Once the sample reaches the syringe, you know the sample has filled the loop.
- With the valve in the default Sample Loading mode, when you raise the plunger, the sample will take the following route from the vial (position 5) to the syringe (position 6): 5 > 4 > 1 > 6.
- With the valve in Sample Injection mode, the pump (position 2) will push the mobile phase through the loop, ‘injecting’ the sample into the column (position 3): 2 > 1 > 4 > 3.
- Click Start; the chromatograph should automatically present itself on the screen (refresh the page if it does not).
- The image below shows the window that will appear when the scan starts.
- Steps 13-23 are the same as when using an Autosampler.
- The image below shows a completed scan of a Coffee sample using an Autosampler.
- Move your mouse over the peak’s row and click the Blue Star that appears.
- A popup will appear allowing you to select a Calibration from a drop-down menu.
- Click “Estimate” after you have selected the Calibration you want to use.
- The graph will now show the calculated amount of the compound in question for this particular injection based on the Calibration.
- You can also run an injection using the “Quick Start” method.
- First, ensure the Method and Column selected for your device are correct. You can edit them by clicking on their respective names.
- Then click Quick Start and select the Vial you want to test. The system will start the Injection.
- To see the chromatograph, click on the Sample title that appears at the top of the page.
- As shown above, one can stop the Injection by clicking the Stop button.
- If you are viewing the chromatograph, you can also stop the Injection by clicking Stop.
- When doing manual injections, it is highly recommended that you wash the valve and loop to clear out any leftover sample and mobile phase.
- See the Alltesta™ Mini Analyzer Set Up Guide for the recommended washing method.
Gradient
- In some cases, to properly separate compounds, you will need 2 chemically similar mobile phases with variations only in concentration (for example, ACN/H2O/H3PO4 at 10%/90%/.03% and at 20%/80%/.03%). In this case, you will need 2 pumps, with each one drawing from a different mobile phase. To set this up in HPLC.Cloud, click on the Settings button on your device’s page as you did when you were initially adding component devices.
- For “Pump B”, select the 2nd pump you would like to use. For “Pump B”, select the 2nd pump you would like to use.
- The system will now be in “Gradient Pump” mode and show both pumps (A and B).
- To set up the Gradient, click “Edit” on the Method section (above).
- In the “Gradient” option now available, click “Add Row”.
- Edit the % of A and B and the time you want the instruction to occur. You can add as many or as few (minimum 1) instructions as you prefer.
- If you change the time for a row, it will automatically move to be in chronological order (two instructions cannot have the same start time, so they will appear in red until one is changed).

- After editing the % value of A or B, the site will automatically enter the reciprocal concentration.
- Click the “Save” button once you're done editing the method.
- You can now start your injection, either by going via the “Samples” tab or via “Quick Start.”
- The system will then control the flow rates of each pump in order to follow the instructions set in the Method.
- Open the chromatograph for the current sample and click on the “Data” bar (Pressure, UV, etc), then the “G” to show the Gradient profile.
Import
- To import externally collected chromatographic data, click on the 3 dots opposite the Sample’s name.
- This will bring up a menu with four different options; click “Import.”
- This will open a menu to select the method and column used, as well as the ability to select a file to import.

- Once the file is selected, click “Upload”.
- The imported file should now appear as a new injection for that Sample.
Cabinet
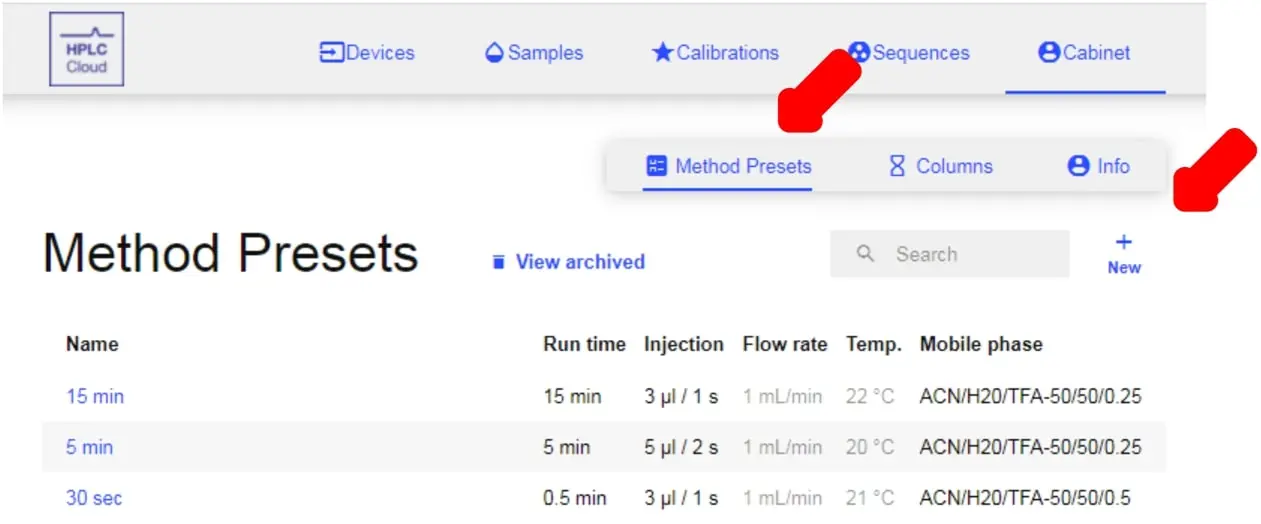
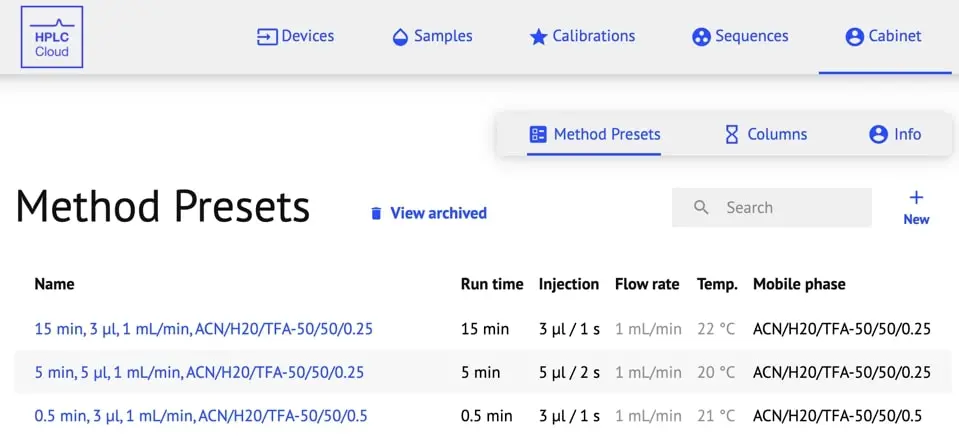
- Click the Cabinet tab at the top of the screen. Here, you will be able to see your pre-set methods, columns, and account information.

- When you click on this tab you will be automatically directed to the Method Presets page. You will be able to see your currently available methods, as well as create new ones.
- In order to create a new method, click on the New button and fill out all the necessary information (below).
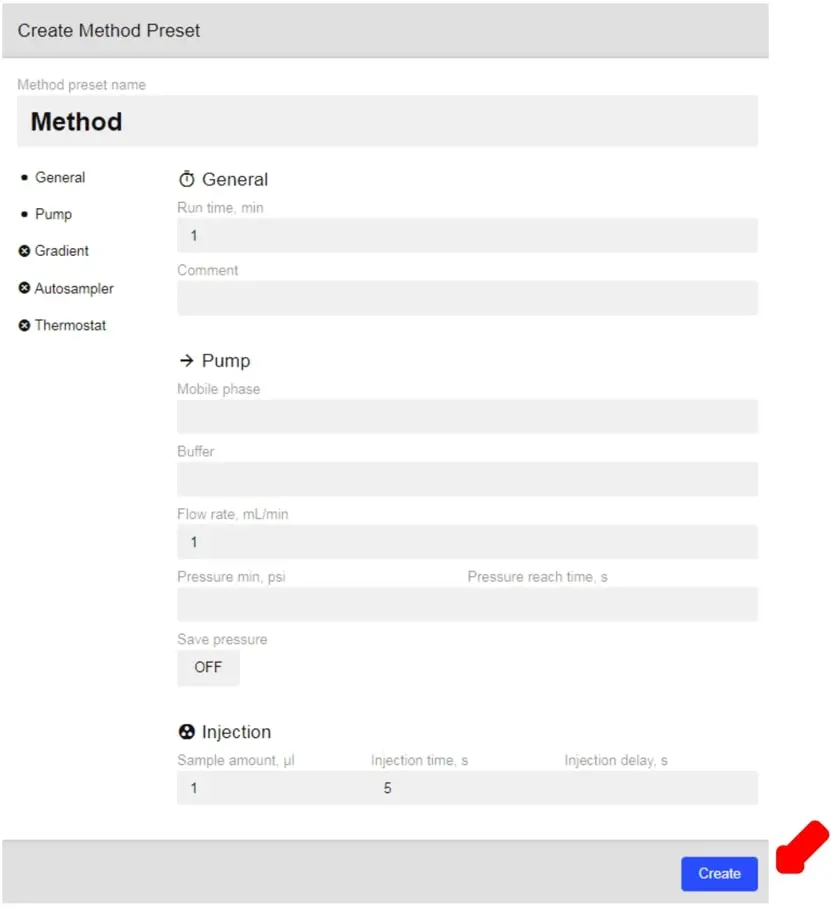
- Once you have filled out the information, click Create and your method will be saved.
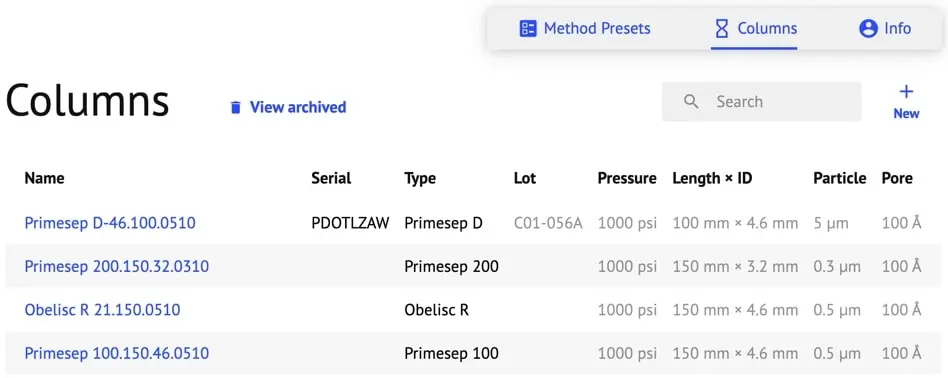
- To view and add new columns, click on the Columns tab.
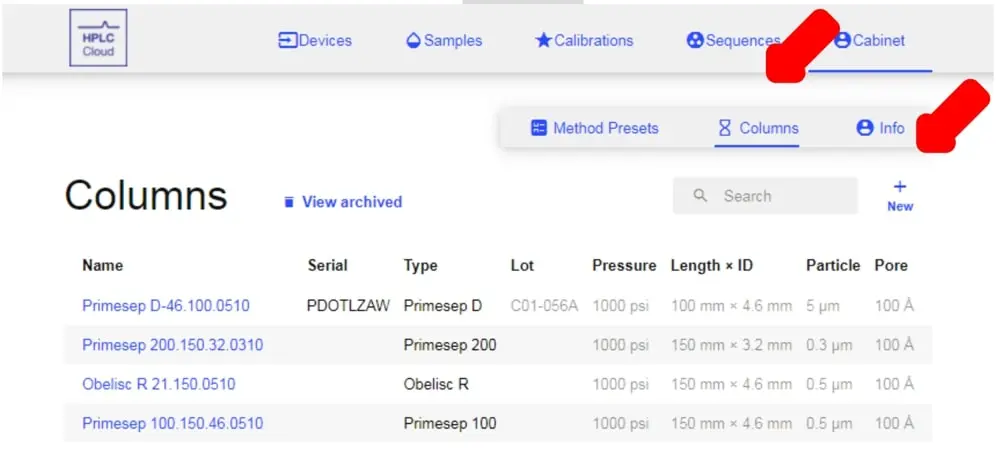
- In order to create a new column, click on the New button and fill out all the necessary information (below).

- Once you have filled out the information, click Create and your column will be saved.
- Instead of filling out the column info manually, you can click the Camera icon in the serial box to open a QR Code Reader.
- Hold up the QR Code on the column packaging to your camera and the system will fill in all the information automatically.
- If you wish to logout, click on the Info tab and select Logout.
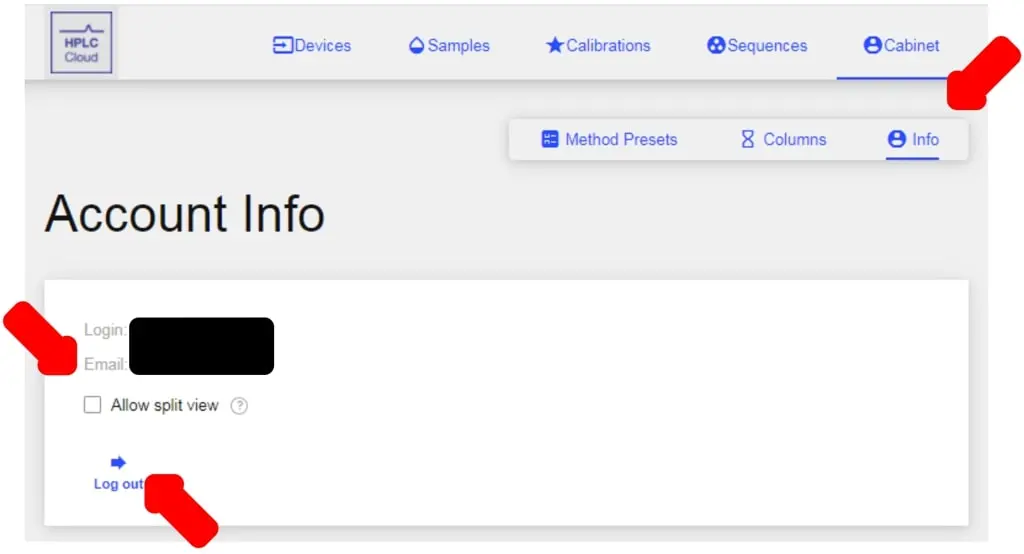
- To enable a split, dual window view, click the box for Allow split view.
That’s everything you need to get an understanding of how HPLC.Cloud works. It’s extremely simple to navigate as well as teaching newcomers their own way around it. Again, HPLC.Cloud is accessible via the cloud which means you can use any device at any time to control your lab as long as you have a connection to the internet.
Troubleshooting
Below are some tips and tricks to troubleshoot some common problems.
Pump stuck but in working state.
- The pump can sometimes get stuck during the Refill stage, as seen in the image below (Pump B is stuck).
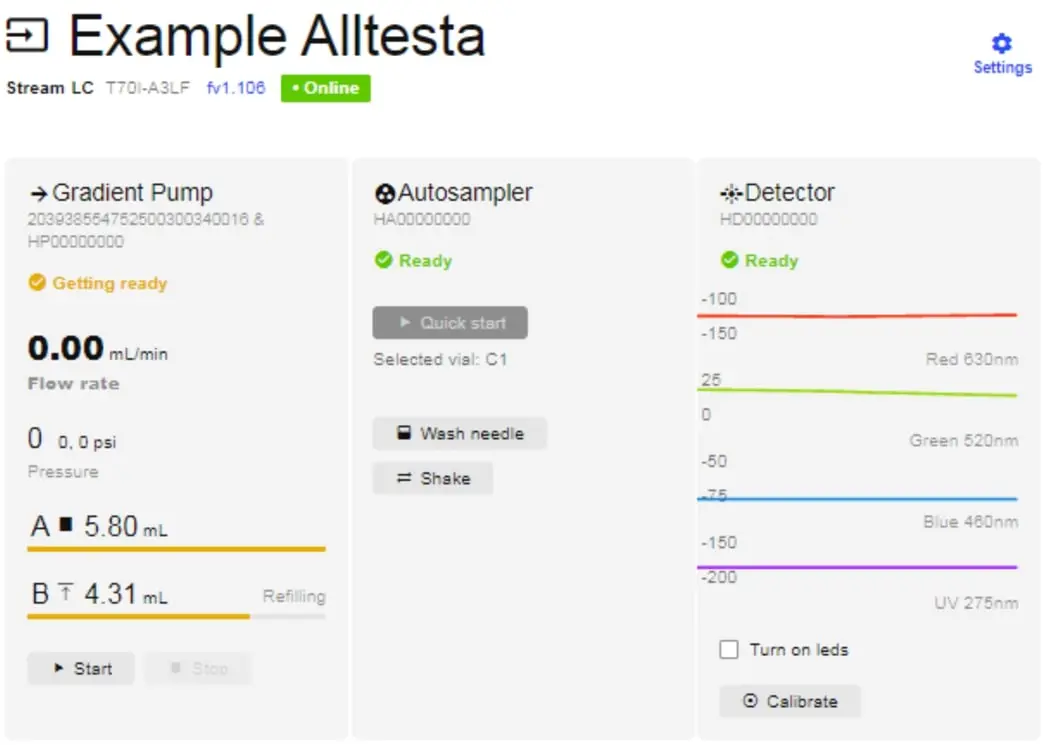
- To fix this issue, simply unplug the pump’s power, count to 5, then plug it back in again.
- The pump should refill properly once it restarts.
Pump cannot reach or maintain minimum pressure.
- Sometimes the system cannot reach or maintain the minimum pressure, and the system will abort the injection.
- This is often caused by a leak or air in the pump.
- First, ensure that all connections are tightened properly and that there is no liquid dripping from any connections.
- If there is liquid, simply loosen the fitting, reset the capillary in the fitting, and screw it back in.
- If there is no liquid, then there may be air in the pump.
- As mentioned in the Alltesta Analyzer Set Up, unscrew the PEEK plug currently in the purge port.

- Screw in a fitting with a teflon capillary (translucent) and connect the capillary to a waste flask.
- Ensure that the fitting for the pump’s intake capillary is tightened completely and that the end of the capillary that is in the mobile phase flask is completely submerged and surrounded by liquid. If it’s not, you may need a longer capillary or more mobile phase in the flask.
- Manually turn the pump on by clicking “Start”.
- If there is air in the pump, you should see bubbles in the tubing.
- Let the pump continue to run until there are no more bubbles exiting the pump (You may need to let the pump run a complete cycle - 5.80 mL).
- The pump should now be drawing from liquid only.
- Unscrew the fitting and capillary and replace it with the original PEEK plug.
Baseline drift in initial part of injection.
- Sometimes there may be an initial baseline drift at the beginning of the scan.
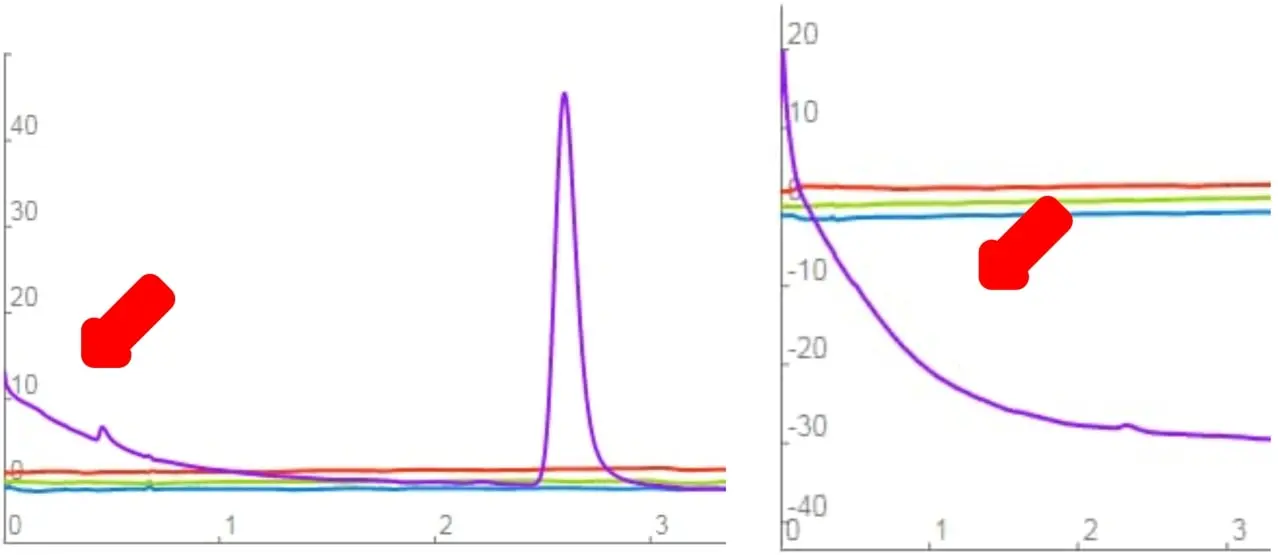
- To alleviate this issue, increase the “Injection Delay” time in the Method.

Capillaries pop out.
- The capillaries can pop out of their fitting when the pressure inside is too high (more than approximately 2000 psi).
- First, reinsert the capillary and the fitting into the correct position.
- Then, lower the flow rate of the method.

- A slower mobile phase will result in a lower internal pressure.
- A higher mobile phase will result in a higher internal pressure
Inconsistent peak heights.
- Sometimes you may get inconsistent peak heights for a particular sample or standard.
- First, check that your sample is properly purified (for standards) or mixed (for solutions).
- If that doesn’t resolve the issue, (and you’re using an Autosampler) then your injection time may be too short.
- Simply increase the injection time in the Method.

- This will keep the needle in the sample for longer, giving the syringe pump enough time to collect the designated sample amount.
- Alternatively, you can increase the intake rate, which will increase the speed at which the syringe pump collects the sample.
Devices
- Edit
- Click to add or delete a device from your Devices list.
- Delete: Deletes the device.
- Add connector: Opens the feature to add a new device.
- XXXX-XXXX: Input device’s Serial number.
- **: Input device’s key.
- Scan: Opens the camera to scan a QR code and automatically add your device.
- Cancel: Cancels and closes the Add Connector feature.
- Finish Editing: Save settings.

- Settings
- Allows user to select component devices:
- Pump
- Gradient Pump (if necessary)
- Detector
- Autosampler
- Tray size
- Device options include:
- Off: Disconnects component device.
- Auto: Automatically selects an available device.
- HP(P/D/A)00000000: The device’s name. Will have one of P/D/A depending on if device is Pump, Detector, or Autosampler.

- Allows user to select component devices:
- Pump
- Start: Manually starts the pump.
- Stop: Manually stops the pump.
- Autosampler
- Quick Start: Creates a new sample and starts an injection for the selected vial.
- Wash Needle: Runs the “Wash Needle” sequence.
- Shake: Shakes the needle (to remove any remaining solution).
- Detector
- Turn on LEDs: Turns on all 4 LEDs.
- Calibrate: Calibrates and “zeroes” the detector to a standard baseline signal.
- Valve Loop
- For manual injections (ie not using an Autosampler).
- Quick Start: Creates a new sample and starts an injection for the selected vial.
- Sample Loading mode: The default valve mode. Also used for washing the loop.
- Sample Injection mode: Valve mode for injecting the sample into the column.
- Method
- Edit/[Method Name]: Hover over the column name and click. Opens the Method window to allow editing of the current Method. To save, click “Save.” To “undo” any immediate changes, click “Revert.”
- Search Bar: Allows you to search and select preset Methods.

- Run Time: Run time for the scan (in minutes).
- Mobile phase: Enter the mobile phase (and percentages of each) you will be using.
- Buffer: Enter the buffer (and percentage) you will be using.
- Pressure min: Set a minimum pressure for the system to reach before starting the injection (optional).
- Pressure reach time: Set the amount of time the system has to reach the minimum pressure (optional).
- Save Pressure: Turn on to save pressure data with the chromatograph (recommended).
- Sample Amount: Sets how much of the sample (in µL) will be injected.
- Injection Time: Sets how long (in s) the collected sample will have to be injected into the pump line.
- Injection Delay: Sets a delay (in s) before injection begins.
- Needle Depth: Sets (in mm) how deep the autosampler will plunge the needle into the sample vial.
- Wash Cycles: Sets how many wash cycles the needle will run after each injection (includes shaking).
- Intake Rate: Sets the speed (in µL/min) at which the syringe will collect the sample.
- Shaking mode before injection: Determines the shaking pattern used.
- Shaking duration: Sets (in s) how long the shaking will last.
- Below you’ll find the suggested intake rate based on the sample amount.
Sample Amount (µL) Suggested Intake Rate 1 10 5 50 10 100 25 250 50 500 100 1000 - Column
- [Column Name]: Hover over the column name to show a drop-down menu, which allows you to select columns from your Cabinet.
- New: Hover over the column name to show a “New” button. Allows you to create a new column and add it directly to your device. Click “Create” when you have input all relevant information.
- Edit: Hover over the column name to show an “Edit” button Allows you to edit the current column information.
- Recent Runs
- Shows the most recent injections on your device.
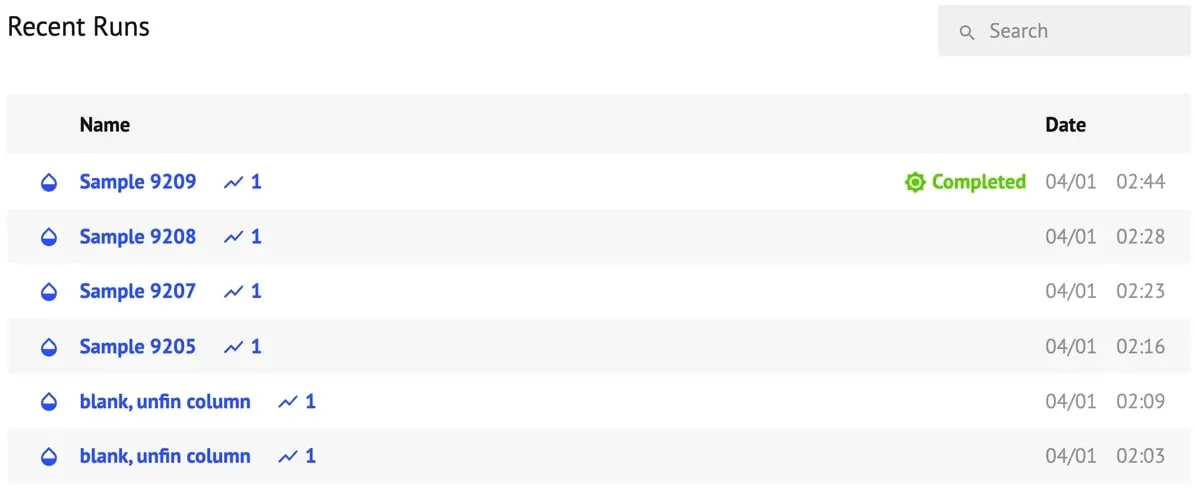
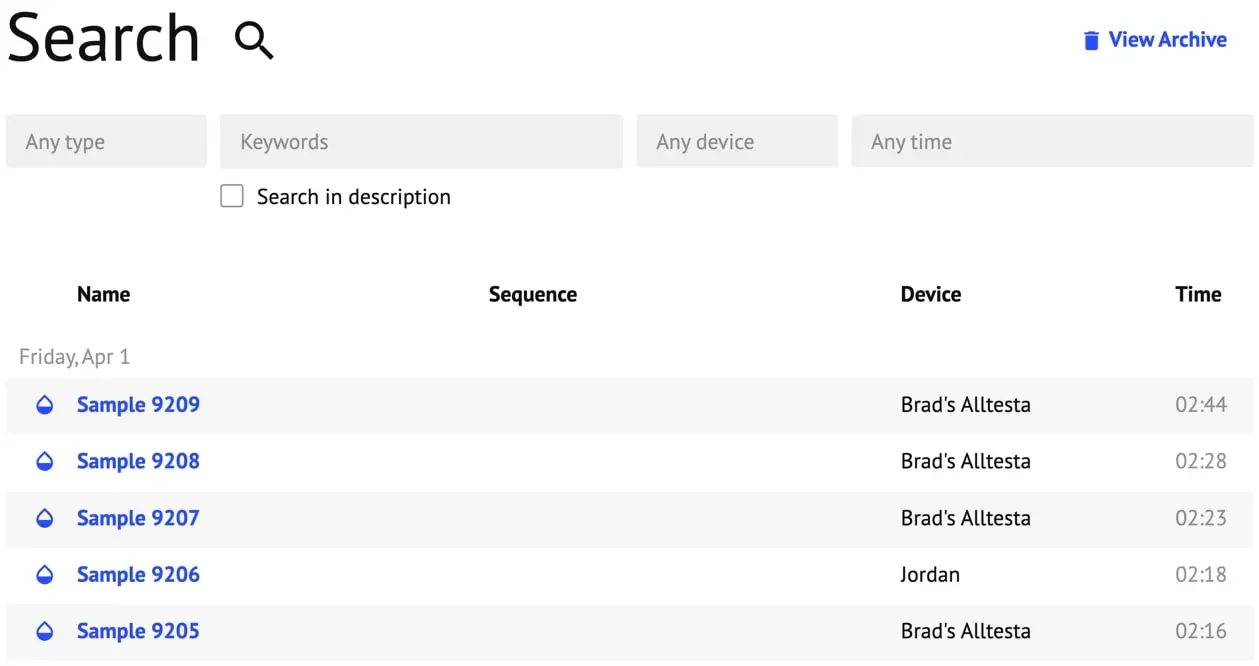
- Search: Click to search through previous runs on your device. Search by:
- Type (Calibration, Sequence, Sample)
- Keyword
- Device (if using more than one device)
- Time (Date Range)
- Click the sample of interest to open its chromatograph.
- Shows the most recent injections on your device.
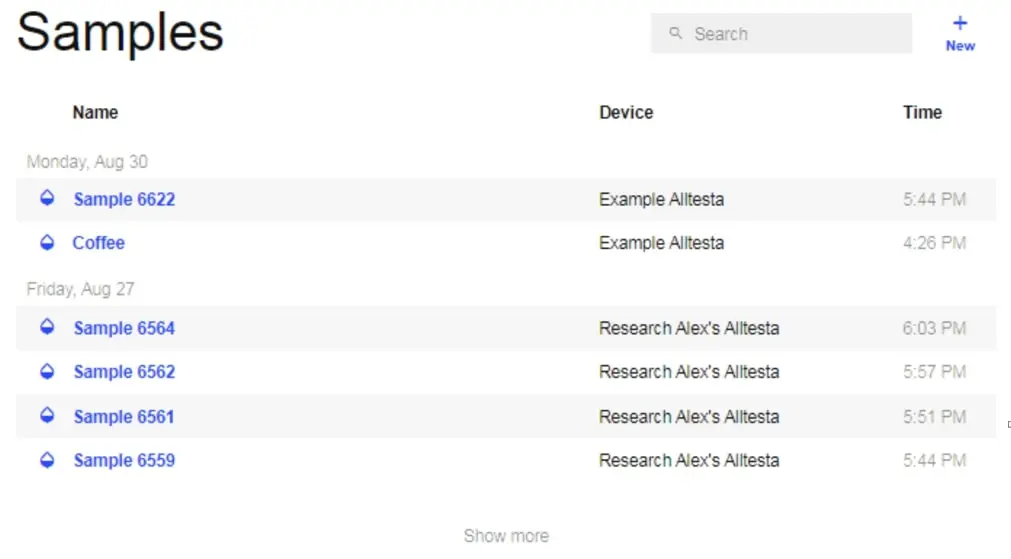
Samples
- Shows all recent Samples created in chronological order (newest to oldest).
- Search: Click to search through all samples created. Search by:
- Type (Calibration, Sequence, Sample)
- Keyword
- Search in Description: enable to search through Sample descriptions as well.
- Device (if using more than one device)
- Time (Date Range)
- New: Click to open a new Sample window. Click “Create” after inputting all relevant information.
- Show more: Shows more Samples.
- Sample Chromatograph
- Click on a tested Sample to open the Chromatograph for that test.
- To edit the Sample name, click on the name, type in a new name, then click outside the text box to save it.
- Injections
- All Injections for this sample are listed in numerical order.
- Click on each number to browse between different Injections.
- Use the arrow keys on your keyboard to cycle between Injections.
- New Injection: Click to start a new Injection of this Sample. Ensure the correct Vial position, Device, Method, and Column are selected, then click “Start.”
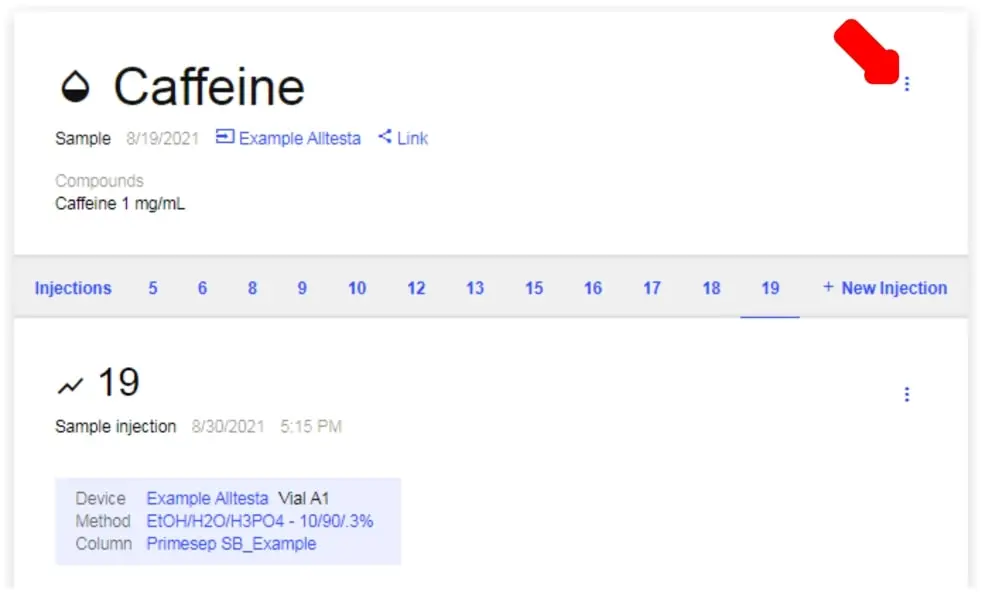
- 3-dot Menus: There are two 3-dot Menus, one that governs the Sample and one that governs the selected Injection.
- Sample Menu:
- Import: Allows you to import your own chromatograph data for a given sample.
- To Calibration: Creates a Calibration based on the Injections done for that sample.
- Edit
- Archive: Archives the entire Sample (including all Injections).

- Injection Menu:
- Edit: Allows you to edit/create a description for the selected Injection.
- Archive: Archives the selected Injection.

- Sample Menu:
- Graphing Tools
- Data: Click to show available options
- Pressure: Toggles on/off Pressure data.
- Red: Toggles on/off Red LED data.
- Green: Toggles on/off Green LED data.
- Blue: Toggles on/off Blue LED data.
- UV: Toggles on/off UV LED data.
- View All: Turns on all LED data.
- Wrench: Click to enable graphing tools.
- Peaks Editing
- Add smart peak: Click to add a peak and the software will match it properly with the baseline.

- Add peak: Click to add a custom peak.
- Erase peak: Click to erase a peak.
- Find Peaks: Click to let the software automatically determine and label peaks. You can delete erroneous peaks by clicking the “X” as shown below.
- Add smart peak: Click to add a peak and the software will match it properly with the baseline.
- Baseline Editing
- Add Baseline: Click to open the Baseline tool. Every click on the graph will be used as a setpoint to create a baseline.
- After desired setpoints are established, click “Finish.”
- To undo a setpoint, click “Undo.”
- To restart the drawing, click “Start Over.”
- Erase Baseline: Click to remove the drawn Baseline.
- Find Baseline: Click to let the software automatically determine the baseline.
- Add Baseline: Click to open the Baseline tool. Every click on the graph will be used as a setpoint to create a baseline.
- Tools
- Download: Download the raw data.

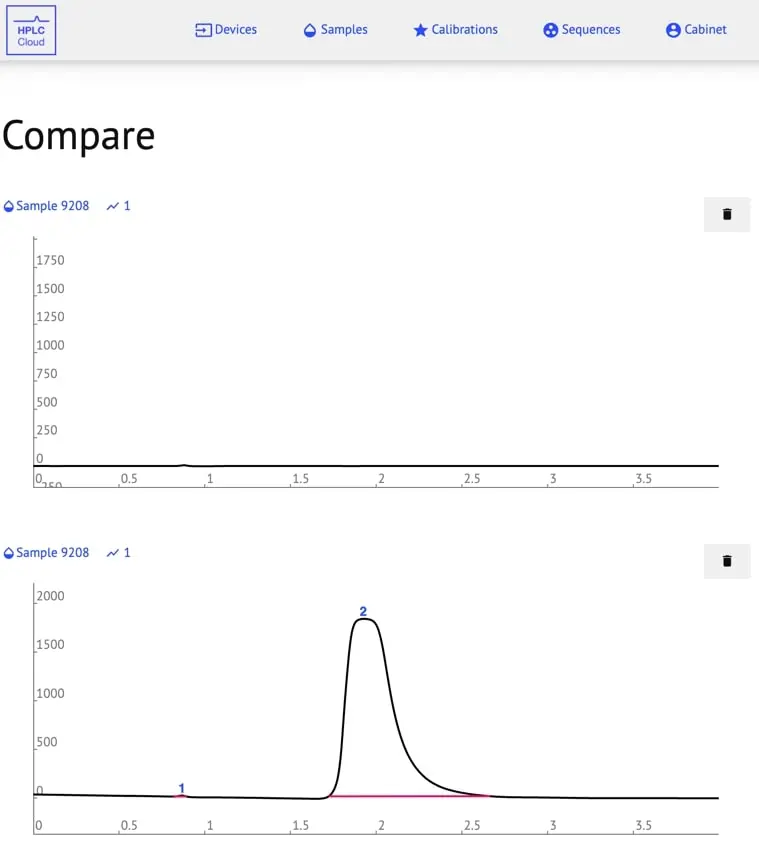
- Compare: Click to add selected Injection to the Compare window. Click again to open the Compare window.
- Favorite: Click to add to Favorites.
- Download: Download the raw data.
- Zoom In: Click and drag over the area on the chromatograph you want to zoom in on.
- Zoom Out: Click on the graph (after zooming in) to zoom out to the original dimensions.
- Peaks Editing
- Data: Click to show available options
Calibrations
- Shows all recent Calibrations created in age-descending order (newest to oldest).
- Search: Click to search through all Calibrations created. Search by:
- Type (Calibration, Sequence, Sample)
- Keyword
- Search in Description: enable to search through Calibration descriptions as well.
- Device (if using more than one device)
- Time (Date Range)
- New: Click to open a new Calibration window. Click “Create” after inputting all relevant information.


- New Injection: Ensure the correct Vial position, Device, Method, and Column are selected, then click “Start.”
- The sample amount and unit can be edited after starting the injection.
- The sample amount and unit can be edited after starting the injection.
- Amount: Sets the amount of known sample in the sample Injection. Unit options are:
- %
- mg/mL
- mol (moles)
- mmol (millimoles)
- Peak: Displays the ratio of mAU (milli-Absorption Units) to time (min) at the peak’s location.
- Select: When hovered over, sets that peak as the Calibration peak.
Sequences
- Shows all recent Sequences created in age-descending order (newest to oldest).
- Search: Click to search through all Sequences created. Search by:
- Type (Calibration, Sequence, Sample)
- Keyword
- Search in Description: enable to search through Sequence descriptions as well.
- Device (if using more than one device)
- Time (Date Range)
- New: Click to open a new Sequence window. Click “Create” after inputting all relevant information.


Cabinet
- Shows Method Presets, Columns, and Account Info.
- Method Presets
- Search: Search by Name only.
- New: Click to open a new Method Preset window. Click “Create” after inputting all relevant information.
- View Archived: Allows you to view deleted/archived Method Presets.
- Columns
- Search: Search by Name only.
- New: Click to open a new Column window. Click “Create” after inputting all relevant information.
- View Archived: Allows you to view deleted/archived Columns.
- Info
- Shows Login/Email info.
- Allow Split View: Click to enable dual window mode.
